A Comprehensive Guide to Building Robust, Cyclic AI Workflows in the Generative AI Era
Introduction: The Shift to Agentic AI
Why do most LLM applications fail in production? Because they lack memory, reasoning, and the ability to adapt.In the rapidly evolving landscape of Generative AI, we are witnessing a paradigm shift. We are moving from simple “question-answering” bots (RAG pipelines) to autonomous agents — systems that can reason, plan, execute actions, and adapt based on feedback.
The ability to create simple chains of prompts is no longer sufficient. Agents need to loop, retry, persist state, and interact with other agents. Enter LangGraph — a library designed to build stateful, multi-agent applications withLLMs.
In this deep dive, we will explore the core architecture of LangGraph, its ecosystem, and how to leverage it to build complex, dynamic AI workflows.
1. LangGraph Architecture and Ecosystem
At its core, LangGraph combines three fundamental building blocks: state management, modular nodes, and intelligent routing. To understand LangGraph, we must first look at where it sits in the broader AI development landscape.
LangGraph in the LangChain Ecosystem →
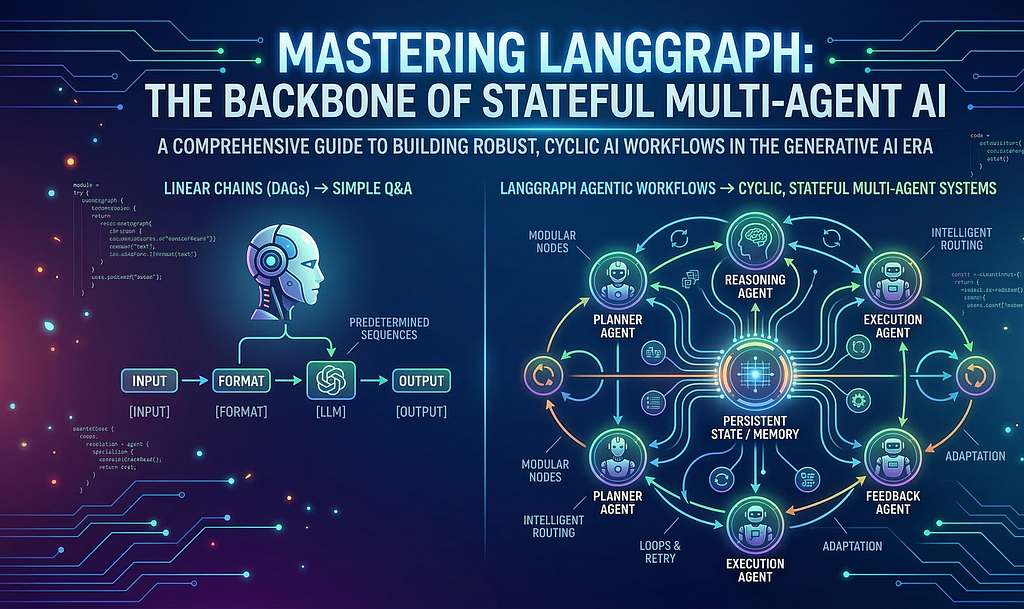
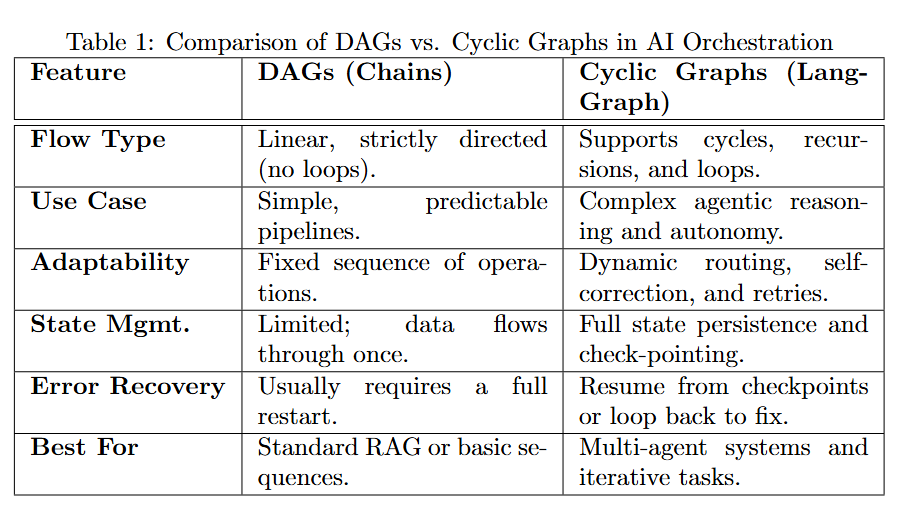
LangGraph is built on top of LangChain, utilizing its primitives (like models, tools, and output parsers). However, while LangChain was originally designed primarily for DAGs (Directed Acyclic Graphs) — linear chains where data flows from start to end — LangGraph introduces the capability for cycles.
Why Graph? The Core Idea
Real-world problem solving isn’t linear.
- Chains (DAGs): Great for predetermined sequences (Input →Format →LLM →Output).
- Graphs (Cyclic): Critical for agentic behaviors. An agent might try to search for information, realize the result is insufficient, and decide to search again with a different query.
Quick Comparison Table

LangGraph Architecture: The State Machine
At its heart, LangGraph mimics a Finite State Machine (FSM). Its architecture is defined by three core concepts:
1. State: A shared data structure (schema) that represents the current snapshot of the application. It evolves as nodes execute.
2. Nodes: Python functions that perform work (calling an LLM, executing a tool, parsing output). They receive the current state and return an *update* to that state.
3. Edges: Control flow logic that determines which Node to execute next based on the current State or the output of the previous node.
Important: Managing State Updates (Reducers)
One of the most confusing aspects for beginners is how state updates work. By default, returning a dictionary overwrites the keys in the state. However, for lists like “messages”, you usually want to append.
LangGraph uses `Annotated` with “Reducers” to handle this.
from typing import Annotated, TypedDict
from langgraph.graph.message import add_messages

class AgentState(TypedDict):
    # This ensures new messages are APPENDED to the list, not overwriting it
    messages: Annotated[list, add_messages]
Code Snippet: Defining State, Nodes, and Edges
from typing import TypedDict, Literal
from langgraph.graph import StateGraph, START, END

# 1. Define State
class AgentState(TypedDict):
    messages: list[str]
    current_mood: Literal["happy", "neutral"]

# 2. Define Nodes
def chatbot_node(state: AgentState):
    # Simulating LLM response
    return {"messages": ["Hello! How can I help?"], "current_mood": "happy"}

def mood_node(state: AgentState):
    return {"messages": ["I am feeling happy today!"]}

# 3. Build Graph
workflow = StateGraph(AgentState)
workflow.add_node("chatbot", chatbot_node)
workflow.add_node("mood_checker", mood_node)

# 4. Add Edges (Control Flow)
workflow.add_edge(START, "chatbot")
workflow.add_edge("chatbot", "mood_checker")
workflow.add_edge("mood_checker", END)

# Compile
app = workflow.compile()
Running the Graph
# Execute the compiled graph
result = app.invoke({"messages": ["Hi there!"], "current_mood": "neutral"})

# Output:
# {
#   "messages": ["Hi there!", "Hello! How can I help?", "I am feeling happy today!"],
#   "current_mood": "happy"
# }

# Streaming execution for real-time feedback
for event in app.stream({"messages": ["Hello"], "current_mood": "neutral"}):
    print(f"Event: {event}")
Output Flow Visualization:
Step 1 → Chatbot Node: Input processed, mood extracted
Step 2 → Mood Checker Node: Mood analysis completed
Result: Complete state with all messages and final mood
2. Prebuilt Agents in LangGraph
LangGraph provides powerful abstractions to get started quickly without defining every node and edge from scratch.
What is an Agent?
In this context, an Agent is a system that uses an LLM as a reasoning engine to determine which actions to take and in what order.
Key Features: Reasoning, Tool Use, Memory (State), and Adaptability.
Use Cases: Customer support bots, coding assistants, research automators.
High Level View (LangGraph-Prebuilt)
The `langgraph-prebuilt` package includes the `create_react_agent`. This implements the ReAct (Reasoning and Acting) pattern standard.
ReAct Agent Flow:
1. Model Node: The LLM receives the input and decides if it needs to call a tool.
2. Conditional Edge: Checks the LLM’s output. If a tool call is detected → Go to Tool Node. If not → End.
3. Tool Node: Executes the tool and adds the result back to the state.
4. Loop: Goes back to the Model Node with the new tool output.
ReAct Loop Visualization (Visual Flow)

rerouted to the side, bypassing other diagram elements for clarity.
Key Points:
→LLM decides what to do based on current context
→Tools are executed only when needed
→Results feed back into the next iteration
→Loop continues until the agent decides it’s complete
Code Snippet: Creating a ReAct Agent
from langgraph.prebuilt import create_react_agent
from langchain_openai import ChatOpenAI
from langchain_core.tools import tool

# 1. Define Tools
@tool
def search_web(query: str):
    """Search for information online."""
    return f"Results for {query}: LangGraph is great!"

# 2. Setup LLM
model = ChatOpenAI(model="gpt-4o")

# 3. Create Agent
agent_app = create_react_agent(model, tools=[search_web])

# 4. Invoke
response = agent_app.invoke({"messages": [("user", "What is LangGraph?")]})
print(response["messages"][-1].content)

#### ReAct Agent Execution Example
# Example execution
query = "What is the capital of France? Multiply it by 2."

# Run the agent
result = agent_app.invoke({"messages": [("user", query)]})

# Output:
# Step 1: LLM thinks about the problem
# "I need to search for the capital of France, then multiply by 2"
#
# Step 2: Tool execution
# Tool call: search_web("capital of France")
# Result: "Paris. 2 * 2 = 4"
#
# Step 3: Final response
# "The capital of France is Paris. Paris * 2 = 4"
Execution Flow Breakdown:

Multi-Agent Systems: `langgraph-supervisor`
For complex tasks, a single agent often hallucinates or loses context. Multi-Agent Systems solve this by breaking tasks down. The `langgraph-supervisor` architecture uses a “Supervisor” LLM to route work to specialized “Worker” agents.
Visualization: Supervisor Architecture
Visual Architecture (ASCII Diagram)

Key Advantages:
→Task Specialization: Each agent is an expert in its domain
→Parallel Execution: Multiple agents work independently
→Result Aggregation: Supervisor combines all results intelligently
→Intelligent Routing: Supervisor adapts to task complexity
Code Snippet: Logic for Routing (Conceptual)
def supervisor_node(state):
    # Ask the supervisor LLM which worker should act next
    messages = state["messages"]
    result = supervisor_model.invoke(messages)

    # Analyze result to determine next node
    if "CODE" in result.content:
        return "coder_agent"
    elif "RESEARCH" in result.content:
        return "researcher_agent"
    else:
        return "FINISH"

# Example of Supervisor Graph Structure
workflow.add_node("supervisor", supervisor_node)
workflow.add_node("coder_agent", code_node)
workflow.add_node("researcher_agent", research_node)

# Conditional Edge from Supervisor
workflow.add_conditional_edges(
    "supervisor",
    lambda x: x["next_step"], # Using logic from node output
    {
        "coder_agent": "coder_agent",
        "researcher_agent": "researcher_agent",
        "FINISH": END
    }
)
3. Designing Custom Workflows
While prebuilt agents are powerful, the true power of LangGraph lies in StateGraph — building custom flows tailored to your specific business logic.
Building the Workflow
To build a custom graph:
1. Define State: Use `TypedDict` or Pydantic to define what data your graph holds (e.g., `messages`, `context`, `errors`).
2. Add Nodes: Register your python functions to the graph.
3. Add Edges: Connect nodes with `add_edge(source, target)` or `add_conditional_edges(source, routing_function)`.
4. Compile:`.compile()` turns the definition into a `Runnable`.
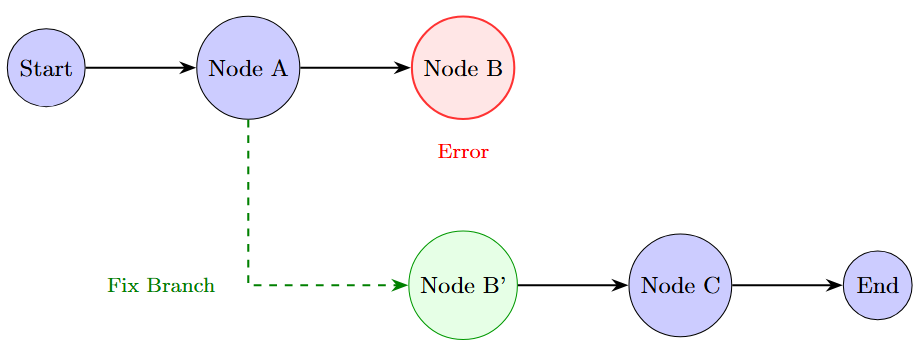
Code Snippet: Conditional Edges
def check_sentiment(state):
    # Determine if feedback is positive or negative
    score = analyze_sentiment(state["messages"][-1])
    if score > 0.5:
        return "thank_user"
    else:
        return "apologize"

# Adding the conditional logic to the graph
workflow.add_conditional_edges(
    "analyze_input", # From this node…
    check_sentiment, # …run this function…
    { # …and map the result to a destination node
        "thank_user": "positive_response_node",
        "apologize": "escalate_ticket_node"
    }
)
Complete Custom Workflow Example
# Full workflow from state to compilation to execution
from typing import TypedDict, Literal
from langgraph.graph import StateGraph, START, END

# Step 1: Define complex state
class OrderState(TypedDict):
    order_id: str
    customer_request: str
    analysis_result: str
    processing_path: Literal["standard", "expedited"]
    final_status: str

# Step 2: Define nodes with actual logic
def analyze_order(state: OrderState):
    # Analyze the request complexity
    complexity = len(state["customer_request"])
    return {"analysis_result": f"Complexity: {complexity} chars"}

def route_decision(state: OrderState) -> str:
    # Route based on analysis
    complexity = int(state["analysis_result"].split(": ")[1])
    return "expedited" if complexity > 100 else "standard"

def process_standard(state: OrderState):
    return {"final_status": "Processed (Standard Path)"}

def process_expedited(state: OrderState):
    return {"final_status": "Processed (Expedited Path) - Priority Handled"}

# Step 3: Build & configure graph
workflow = StateGraph(OrderState)

# Add nodes
workflow.add_node("analyze", analyze_order)
workflow.add_node("standard", process_standard)
workflow.add_node("expedited", process_expedited)

# Add conditional edge based on routing
workflow.add_edge(START, "analyze")
workflow.add_conditional_edges(
    "analyze",
    route_decision,
    {"standard": "standard", "expedited": "expedited"}
)

workflow.add_edge("standard", END)
workflow.add_edge("expedited", END)

# Step 4: Compile
app = workflow.compile()

# Step 5: Execute with different inputs
result1 = app.invoke({
    "order_id": "ORD-001",
    "customer_request": "Simple order",
    "analysis_result": "",
    "processing_path": "standard",
    "final_status": ""
})
print(f"Result 1: {result1['final_status']}")
# Output: Processed (Standard Path)

result2 = app.invoke({
    "order_id": "ORD-002",
    "customer_request": "This is a complex order requiring detailed analysis and special handling with multiple conditions",
    "analysis_result": "",
    "processing_path": "standard",
    "final_status": ""
})
print(f"Result 2: {result2['final_status']}")
# Output: Processed (Expedited Path) - Priority Handled
Persistence & Memory
One of LangGraph’s strongest features is native Persistence. By passing a `checkpointer` (like `MemorySaver`, Redis, or Postgres) when compiling the graph, LangGraph automatically saves the state after *every* node execution.
Why is this vital?
Long-running jobs: If a server crashes, the graph resumes from the last checkpoint.
Human-in-the-loop: You can pause execution, wait for user input, and resume days later.
Code Snippet: Adding Persistence
from langgraph.checkpoint.memory import MemorySaver
# 1. Initialize Checkpointer
memory = MemorySaver()
# 2. Compile with Checkpointer
app = workflow.compile(checkpointer=memory)
# 3. Invoke with Thread ID (Session Management)
config = {"configurable": {"thread_id": "session-123"}}
app.invoke({"messages": ["Hi"]}, config=config)
# Subsequent calls retrieve the same state!
Time Travel
Because every step is checkpointed, LangGraph supports Time Travel.
Rewind: You can view the state history and “rewind” to a previous step.
Fork: You can edit the state at a past point (e.g., correcting a user’s input or injecting a new instruction) and fork the execution from there.
Visualization: Time Travel
resume execution.
Tool Integration
Tools are first-class citizens. You can wrap standard Python functions as tools. In a custom graph, you typically have a specific “ToolNode” that intercepts tool calls generated by the LLM, executes them, and returns the output to the state.
Code Snippet: Adding ToolNode
from langgraph.prebuilt import ToolNode

# 1. Provide tools to the LLM so it knows *when* to call them
tools = [search_web, calculate_tax]
llm_with_tools = model.bind_tools(tools)

# 2. Add the executable ToolNode to handle the actual tool execution
tool_node = ToolNode(tools)
workflow.add_node("tools", tool_node)

# 3. Use standard edge or conditional logic to route to tools
workflow.add_edge("tools", "agent")
Interrupts (Human-in-the-Loop)
Real-world applications often require human approval (High Stakes). LangGraph allows `interrupt_before` or `interrupt_after` specific nodes.
Example: An agent writes an email. The graph pauses before the “Send Email” node. A human reviews the draft via UI, approves it, and the graph resumes execution.
Code Snippet: Setting an Interrupt
# Compile the graph with an interrupt
app = workflow.compile(
    checkpointer=memory,
    interrupt_before=["send_email_node"] # Pauses right before this node starts
)

# Execution flow:
# 1. Run until "send_email_node"
# 2. Graph stops. Status is 'interrupted'.
# 3. Human inspects state.
# 4. User approves -> Resume:
app.invoke(None, config=config) # Continues from where it left off
Memory Structures
Unlike simple conversational memory (just storing a list of messages), LangGraph state is structured. You can store conversation history alongside structured data (e.g., `extracted_entities`, `current_plan`, `user_preferences`).
4. LangGraph APIs: Functional and Graph API
LangGraph supports two main styles of definition, catering to different developer preferences:
LangGraph Feature Matrix
1. Graph API (StateGraph):
Style: Declarative.
Usage:You explicitly modify the graph structure. `workflow = StateGraph(State)`, `workflow.add_node(…)`, `workflow.add_edge(…)`.
Best For: Complex control flows, conditional branching, and when you need visualization of the graph topology.
2. Functional API (Entrypoint):
Style: Pythonic / Decorator-based.
Usage: Uses decorators like `@entrypoint` and `@task`. It looks like writing standard Python functions calling each other.
Best For: Developers who prefer standard code structure over defining graph schemas, while still getting LangGraph’s orchestration and checkpointing benefits under the hood.
5. Dynamic AI Graphs: Combining Subgraphs and Streaming
As your application grows, a single graph becomes unwieldy.
SubGraphs
LangGraph allows you to treat a graph as a node within another graph. This concept of SubGraphs allows for modular encapsulation. You can build a specialized “Writing Team” graph and embed it inside a larger “Content Marketing” graph. The parent graph doesn’t need to know the internal logic of the child graph, just its inputs and outputs.
Code Snippet: Defining a SubGraph
# 1. Define Child Graph (e.g., Writer Graph)
writer_workflow = StateGraph(WriterState)
writer_workflow.add_node("draft", draft_node)
writer_workflow.add_node("critique", critique_node)
# … connect edges …
writer_app = writer_workflow.compile()

# 2. Define Parent Graph
main_workflow = StateGraph(MainState)
main_workflow.add_node("planner", planner_node)

# 3. Add Child Graph as a Node
main_workflow.add_node("writing_team", writer_app) # Just add the compiled app

# 4. Connect
main_workflow.add_edge("planner", "writing_team")
main_workflow.add_edge("writing_team", END)
Visualization: SubGraphs

SubGraph within the Parent workflow.
Streaming for UX
Latency matters. LangGraph is designed for Streaming. It supports:
Stream Events: Receive generic events for every node transition (useful for logging/debugging).
Stream Mode “values”: Get the full state emitted after every node finishes.
Stream Mode “updates”: Get only the delta (what changed) in the state.
Token Streaming: Stream the raw tokens from the LLM within a node as they are generated — essential for chat interfaces to feel responsive.
Code Snippet: Streaming Output
# Stream updates as they happen
async for chunk in app.astream(
    {"messages": [("user", "Write a haiku about code.")]},
    stream_mode="updates" # or "values" or "debug"
):
    for node_name, state_update in chunk.items():
        print(f"Update from {node_name}: {state_update}")
6. Deployment & Monitoring: LangGraph Studio & Cloud
Once your graph is built, how do you debug and deploy it? This is where the ecosystem shines.
LangGraph Studio
LangGraph Studio is a specialized IDE for visualizing and interacting with your graphs. Instead of running `python main.py` and reading terminal logs, you can:
1. Visualize the Graph: See the actual nodes and edges rendered dynamically.
2. Inspect State: Click on any step in the history to see the exact state (messages, variables) at that point.
3. Edit State & Replay: Modify the state in the UI and re-run from that point (Time Travel as a UI feature).
Configuration & Parameters
Hardcoding models or prompts is bad practice. LangGraph supports `configurable` parameters that can be passed at runtime. This allows you to use the same graph definition but swap out the model (e.g., GPT-4 vs. Claude 3) or change system prompts dynamically.
Code Snippet: Runtime Configuration
def chatbot_node(state, config):
    # Access runtime configuration
    model_name = config.get("configurable", {}).get("model", "gpt-3.5-turbo")
    llm = ChatOpenAI(model=model_name)
    return {"messages": [llm.invoke(state["messages"])]}

# Run with custom config
app.invoke(
    {"messages": [("user", "Hi")]},
    config={"configurable": {"model": "gpt-4-turbo"}}
)
Conclusion
LangGraph represents the shift from “Chain-of-Thought” to Graph-of-Thought. By allowing developers to model cycles, state, and complex multi-agent interactions explicitly, it opens the door to building AI that can truly work for us, rather than just talking to us.
Whether you are using prebuilt agents for quick prototypes or architecting complex custom workflows with “Time Travel” and human interrupt patterns, LangGraph provides the infrastructure needed for the next generation of LLM applications.
The Future is Agentic
The journey from monolithic LLM calls to distributed, reasoning agents isn’t optional — it’s the inevitable evolution of AI development. Start with LangGraph today: experiment with the prebuilt agents, build your first stateful workflow, and experience the power of multi-agent orchestration.
Your AI applications will be faster, smarter, and infinitely more reliable.
Mastering LangGraph: The Backbone of Stateful Multi-Agent AI was originally published in Towards AI on Medium, where people are continuing the conversation by highlighting and responding to this story.