👉 The will be provided at the end 🙂

You’ve probably seen the demo. Someone drops a PDF into a chat interface, asks a question about page 47, and the AI answers accurately. It looks like magic. Then you try to build it yourself and spend three days debugging CORS errors, Terraform quota failures, and an App Service that serves the Azure default page no matter what you deploy.
The gap between “RAG demo” and “RAG system that works in production” is enormous, and almost nobody talks about what actually lives inside it. This article does.
Retrieval-augmented generation is one of the most practical AI patterns available to developers right now. It solves a real problem: large language models are trained on public data up to a cutoff date, and they hallucinate when asked about anything outside that. RAG fixes this by giving the model the relevant content at query time, as context it can read and reason over, rather than facts it has to recall from memory.
But making that work reliably, at scale, in a cloud environment that your team can maintain without specialist knowledge, is a different problem. That is what this guide covers.
By the end, you will have a complete understanding of the architecture, a working step-by-step implementation using FastAPI, Next.js, Azure AI Search, and Azure OpenAI, a clear comparison of Azure AI Search against its main competitors, and an honest breakdown of where this stack succeeds and where it struggles.
What is RAG ?
Before writing a single line of code, it is worth being precise about what the pattern actually does, because the term gets used loosely.
RAG stands for retrieval-augmented generation. It combines two systems that have traditionally been separate: a search engine and a language model. The search engine finds relevant content. The language model reads that content and generates a response. Neither system does the other’s job.
This matters because language models alone have two problems that make them unreliable for enterprise use:
- They hallucinate. When they do not know something, they often generate a plausible-sounding answer rather than admitting uncertainty.
- They cannot access private data. Your internal documentation, customer records, and proprietary research do not exist in their training data.
RAG addresses both. Because the model is given specific source material at inference time, it does not need to recall facts from memory. And because retrieval happens at query time, you can update the document index without retraining anything.
The architecture looks like this:
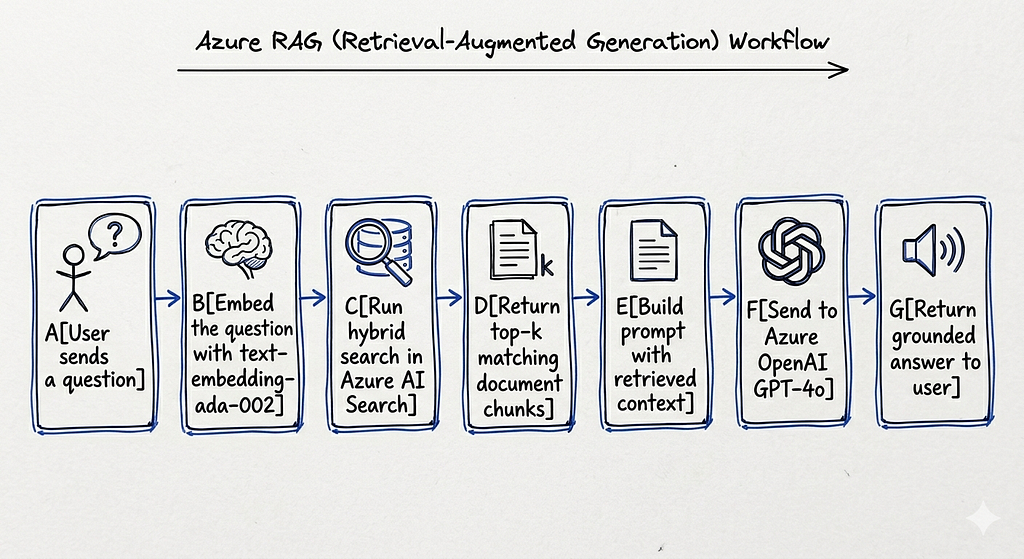
The word “grounded” matters here. The model’s answer is anchored to real source content you control. If the source does not contain the answer, a well-prompted RAG system will say so.
Vector embeddings
An embedding is a numerical representation of text, typically a list of 1,536 floating-point numbers for text-embedding-ada-002. The key property is that semantically similar texts produce embeddings that are geometrically close to each other in that high-dimensional space.
A useful analogy: imagine every sentence in your document library as a point in 3D space. Sentences about similar topics cluster together. When a user asks a question, you convert that question into a point in the same space, and retrieve the nearest neighbours. That is vector search.
Hybrid search
Pure vector search is powerful but imperfect. It handles semantic similarity well but sometimes misses exact keyword matches, such as product names, error codes, or specific identifiers. Pure keyword search handles exact matches but fails on paraphrasing.
Hybrid search runs both in parallel and merges the results. Azure AI Search does this natively, with no additional infrastructure. It is one of the strongest arguments for the Azure stack.
Chunking
Documents need to be split into smaller pieces before embedding. This step is called chunking, and it matters more than most tutorials admit. A 500-character chunk is specific enough to retrieve precisely but short enough that each chunk covers a coherent topic. A 2,000-character chunk contains more context per result but retrieves less precisely.
The right chunk size depends entirely on your document structure. Dense legal prose behaves differently from technical documentation with short sections. You will tune this.
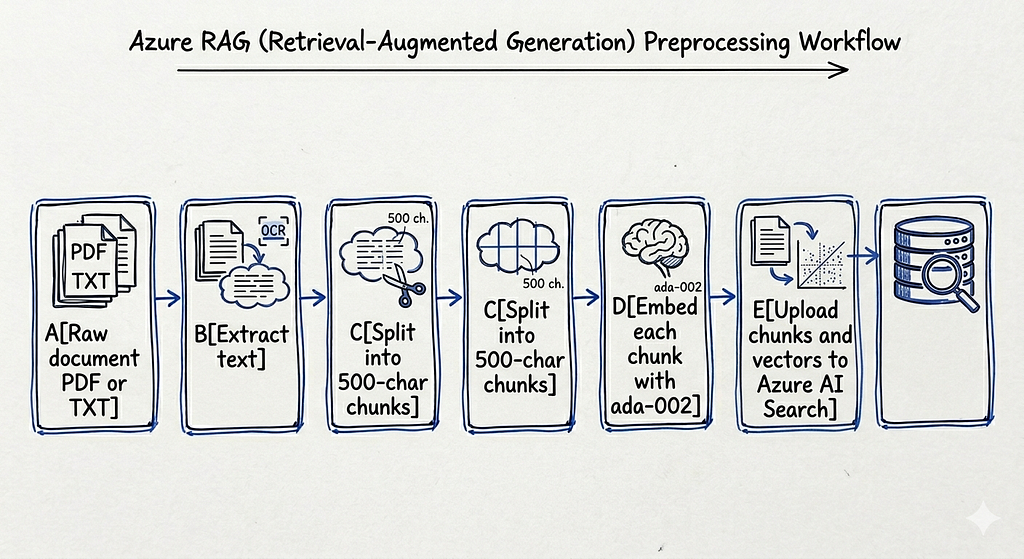
The ingestion pipeline
The ingestion pipeline runs once per document, or whenever a document changes. It is separate from the query pipeline and runs offline:
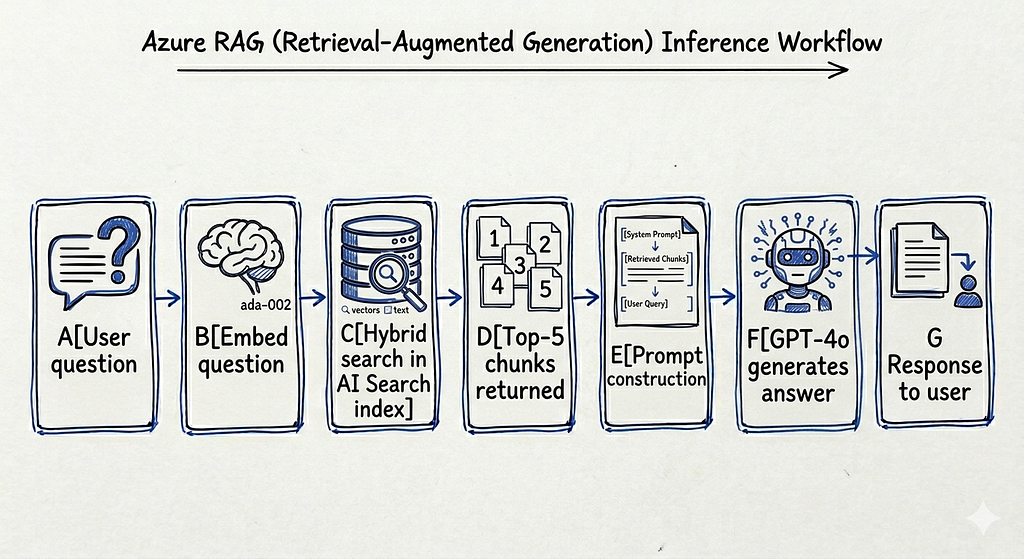
The query pipeline runs at inference time, triggered by every user question:
The full stack at a glance
Before diving into implementation, here is how the entire system is wired together in production:

Every cloud resource is defined in Terraform. No manual portal steps are required after the initial az login. Terraform writes the backend .env file automatically after terraform apply, so credentials are never copied by hand.
Step-by-step: building the system from zero
This section walks through the full implementation in order, from local setup to production deployment. Follow these steps sequentially.
Step 1: Set up your local Python environment
Start with the backend. Create and activate a virtual environment, then install dependencies:
cd backend
python -m venv .venv
source .venv/bin/activate
pip install -r requirements.txt
```

The core dependencies are:
```
fastapi>=0.111.0
uvicorn[standard]>=0.29.0
openai>=1.30.0
azure-search-documents>=11.4.0
azure-storage-blob>=12.19.0
python-dotenv>=1.0.0
python-multipart>=0.0.9
pypdf>=4.0.0
Install pypdf separately if you encounter an import error during ingestion:
pip install pypdf
Step 2: Configure your environment variables
Copy the example file:
cp backend/.env.example backend/.env
You can fill in two values immediately. The rest will be written by Terraform after infrastructure is provisioned:
AZURE_OPENAI_DEPLOYMENT=gpt-4o
AZURE_SEARCH_INDEX=rag-index
Leave AZURE_OPENAI_KEY, AZURE_SEARCH_KEY, AZURE_OPENAI_ENDPOINT, AZURE_SEARCH_ENDPOINT, and AZURE_STORAGE_CONNECTION_STRING empty. Terraform writes all of these automatically.
Step 3: Understand the retrieval logic
The heart of the query pipeline is the retrieval module. Here is how it works:
from azure.search.documents.models import VectorizedQuery
from app.rag.embeddings import create_embedding

def retrieve_documents(query: str, top: int = 5):
    embedding = create_embedding(query)

    vector_query = VectorizedQuery(
        vector=embedding,
        k_nearest_neighbors=top,
        fields="embedding",
    )

    results = search_client.search(
        search_text=query,        # keyword search
        vector_queries=[vector_query],  # vector search
        top=top,
    )

    return [doc["content"] for doc in results if "content" in doc]
Both search_text and vector_queries are passed simultaneously. Azure AI Search runs both in parallel and merges results using its internal ranking algorithm. This is hybrid search in practice, and it requires no extra configuration.
The embeddings function uses text-embedding-ada-002 via the Azure OpenAI client:
def create_embedding(text: str) -> list[float]:
    response = client.embeddings.create(
        input=text,
        model="text-embedding-ada-002",
    )
    return response.data[0].embedding
The returned vector has 1,536 dimensions. The search index is configured to match this exactly.
Step 4: Set up the prompt and generation layer
The generation layer takes the retrieved chunks and the user question and passes them to GPT-4o with a strict system prompt:
SYSTEM_PROMPT = """You are an assistant answering questions from documents.

Context:
{retrieved_chunks}

Question:
{user_question}

Answer using only the context."""

def generate_answer(query: str, docs: list) -> str:
    chunks = "\n\n".join([d if isinstance(d, str) else d.get("content", "") for d in docs])
    prompt = SYSTEM_PROMPT.format(retrieved_chunks=chunks, user_question=query)

    response = client.chat.completions.create(
        model=os.getenv("AZURE_OPENAI_DEPLOYMENT", "gpt-4o"),
        messages=[{"role": "user", "content": prompt}],
    )
    return response.choices[0].message.content
The instruction “answer using only the context” is the single most important line in the entire system for preventing hallucinations. Without it, GPT-4o will supplement missing information from its training data and fabricate details.
Step 5: Provision Azure infrastructure with Terraform
Before provisioning, check your GPT-4o quota. This is the single most common failure point:
az login
az account set --subscription <your-subscription-id>

az cognitiveservices usage list --location westeurope \
  --query "[?contains(name.value, 'gpt-4o')]" -o table
If GlobalStandard shows a limit of zero, you need to use DataZoneStandard instead. Edit openai.tf:
scale {
  type     = "DataZoneStandard"
  capacity = 20
}
DataZoneStandard has capacity available by default in West Europe. GlobalStandard requires a Microsoft approval process that can take days.
Now apply the infrastructure:
cd infra/terraform
terraform init
terraform plan
terraform apply


This creates 13 resources. The search index is created automatically by a `null_resource` that calls the Azure AI Search REST API immediately after the service is provisioned. After apply completes, `backend/.env` is written with all real values. No manual credential copying required.

Resources created:

azurerm_resource_group.rg
azurerm_cognitive_account.openai
azurerm_cognitive_deployment.gpt4o
azurerm_cognitive_deployment.embeddings
azurerm_search_service.search
null_resource.search_index
azurerm_storage_account.storage
azurerm_storage_container.documents
azurerm_service_plan.backend
azurerm_linux_web_app.backend
azurerm_static_web_app.frontend
local_file.backend_env
random_string.suffix
Step 6: Ingest your first document
Run the ingestion script from the backend directory with PYTHONPATH set:
cd backend
PYTHONPATH=. python ../scripts/ingest_documents.py --file ../docs/sample.pdf

Expected output:

Loading: ../docs/sample.pdf
Chunking...
  72 chunks created
Indexing...
Done.
The script extracts text from the PDF, splits it into 500-character chunks, embeds each chunk, and uploads everything to the Azure AI Search index. A time.sleep(0.5) between embedding calls prevents hitting the embeddings rate limit. Increase the delay if you are still hitting limits.
Start with a small document, 5 to 10 pages, and verify the chunks appear in the Azure portal before running bulk ingestion. Confirming the index is populated before querying it saves significant debugging time.
Step 7: Start the backend and test the query endpoint
cd backend
source .venv/bin/activate
uvicorn app.main:app --reload --port 8000
Test with a curl request:
curl -X POST "http://localhost:8000/chat?query=What+is+RAG?"
Expected response:
{"answer": "RAG stands for Retrieval-Augmented Generation. It is a technique that combines..."}If you see an empty answer or an error, check three things in order: confirm the index has documents via the Azure portal search explorer, confirm AZURE_SEARCH_INDEX in .env matches the actual index name (rag-index), and confirm the embedding dimensions in the index schema match text-embedding-ada-002's 1,536 dimensions.
Step 8: Start the frontend and test the full flow
cd frontend/react-app
npm install
npm run dev -- -p 3002
Open http://localhost:3002. Type a question about the document you ingested. The frontend sends a POST request to the FastAPI backend, which runs hybrid search and passes the results to GPT-4o. You should see an answer grounded in your document's content.
Step 9: Deploy the backend to Azure App Service
Package the backend, excluding the virtual environment and cached files:
cd backend
zip -r /tmp/backend.zip . \
  --exclude ".venv/*" \
  --exclude "__pycache__/*" \
  --exclude "*.pyc" \
  --exclude ".env"

az webapp deploy \
  --resource-group rag-project-rg \
  --name <your-app-service-name> \
  --src-path /tmp/backend.zip \
  --type zip
Set the startup command. This step is critical and frequently missed:
az webapp config set \
  --name <your-app-service-name> \
  --resource-group rag-project-rg \
  --startup-file "bash startup.sh"

az webapp restart \
  --name <your-app-service-name> \
  --resource-group rag-project-rg
Without this, App Service does not know how to start a uvicorn server. It shows the default Azure page and returns HTTP 200 with no JSON content. The container logs will show exit code 127, which means the startup command was not found. The fix is always this configuration step.
Verify the deployed backend:
curl -X POST "https://<your-app-service>.azurewebsites.net/chat?query=hello"
Step 10: Deploy the frontend to Azure Static Web Apps
Update the CORS allow_origins in backend/app/main.py with the Static Web App URL from terraform output static_web_app_url, then redeploy the backend.
Build the frontend with the production API URL baked in:
cd frontend/react-app
NEXT_PUBLIC_API_URL=https://<your-app-service>.azurewebsites.net npm run build
Get the deployment token and deploy:
az staticwebapp secrets list \
  --name rag-frontend \
  --resource-group rag-project-rg \
  --query "properties.apiKey" -o tsv

npx @azure/static-web-apps-cli deploy out \
  --deployment-token <token> \
  --env production
Your system is now live. Documents are indexed in Azure AI Search, the FastAPI backend runs on App Service, and the Next.js frontend is served from Azure Static Web Apps.
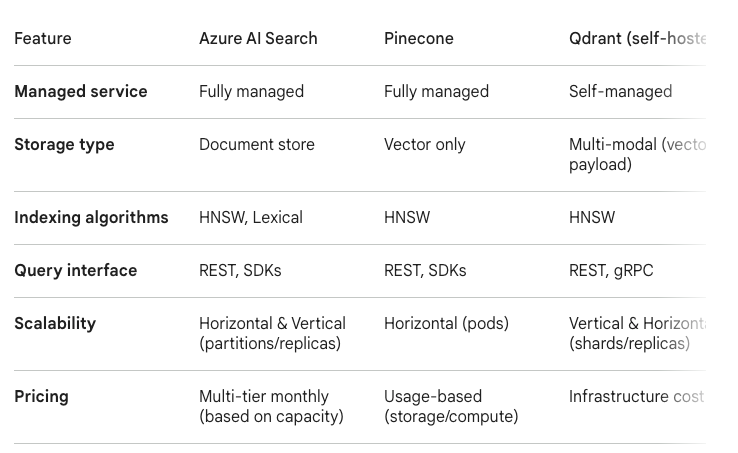
Comparing Azure AI Search against its main competitors
Choosing a vector search backend is one of the most consequential architectural decisions in a RAG system. The retrieval layer determines latency, cost, operational burden, and the quality of results. Here is an honest comparison of the three most realistic options for a production system.
Building a production RAG system on Azure: from zero to deployed
Az-rag(https://github.com/allglenn/Az-rag) is an open-source, production-ready Retrieval-Augmented Generation system built on Azure. It combines a FastAPI backend, a Next.js frontend, and a fully automated Terraform infrastructure to let you chat with your own documents using GPT-4o. Upload a PDF, run the ingestion pipeline, and the system chunks, embeds, and indexes your content into Azure AI Search. Every query runs a hybrid vector and keyword search before hitting the model, grounding answers in your actual documents rather than the model’s training data. The entire stack — from local development to cloud deployment — is reproducible from a single terraform apply, with secrets never leaving Azure App Settings.
Further reading
- Azure AI Search vector search overview — Official documentation covering HNSW configuration, hybrid search ranking, and index schema design for vector workloads
- RAG survey: retrieval-augmented generation for large language models (arxiv 2312.10997) — Comprehensive academic survey of RAG architectures, chunking strategies, retrieval techniques, and evaluation methods
- Azure OpenAI quotas and limits — Covers GlobalStandard vs DataZoneStandard capacity tiers, how to request quota increases, and rate limit behaviour
- Terraform azurerm provider reference — Full reference for every Azure resource used in this stack, including azurerm_cognitive_account and azurerm_search_service
- Pinecone vs Weaviate vs Qdrant: a practical vector database comparison (Superlinked) — Independent benchmark comparing latency, throughput, and cost across the leading vector databases
- Chunking strategies for LLM applications (Pinecone blog) — Practical guide to fixed-size, sentence-based, and recursive chunking with retrieval quality tradeoffs explained
How to Build a RAG system on Azure: From Local Dev to Production(Terraform, Python, NextJS) was originally published in Towards AI on Medium, where people are continuing the conversation by highlighting and responding to this story.