Claude Code Section 2: Making Claude Personal — 7 Concepts That Turn a Generic Tool Into Your Custom Coding Partner
This is Section 2 of a 4-part series on mastering Claude Code. If you haven’t read Section 1 — The Foundations — start there first. This section builds directly on those 8 concepts.
Here’s the problem most developers hit after their first week with Claude Code.
It works great in session one. You get things done, you’re impressed, you close the terminal. Next day you open it again and you’re back to square one. Claude doesn’t know your stack. It doesn’t remember that you prefer pnpm over npm. It doesn't know your folder structure, your naming conventions, or that your test suite requires a running Redis instance.
Every session starts from zero. You end up re-explaining the same context, correcting the same habits, rebuilding the same mental model — over and over.
This is the problem Section 2 solves.
The 7 concepts in this section are about persistence, personalization, and control. They transform Claude Code from a smart but forgetful assistant into something that feels like it was built specifically for your project. Once these are in place, you stop repeating yourself and start compounding.
Let’s build that.
Concept 1: CLAUDE.md — Your Project’s Constitution
CLAUDE.md is the single most important file you can create in your codebase. It's a Markdown file that Claude Code reads at the start of every session, automatically, before you type a single word. Everything inside it becomes persistent context — always on, never forgotten.
Think of it as the constitution for your project. While prompts are temporary (they disappear with the session), CLAUDE.md is the permanent law.
Where files live and what they control:
~/.claude/CLAUDE.md              # Global — applies to ALL your projects
./CLAUDE.md                      # Project-level — checked into source control
./CLAUDE.local.md                # Personal project-level — gitignored
./src/api/CLAUDE.md              # Directory-level — applies only in that subtree
A production-ready CLAUDE.md template:
# Project: payments-service
## Stack
- Node.js 20, TypeScript 5.4, Express 4
- PostgreSQL via Prisma ORM
- Jest for unit tests, Supertest for integration
- pnpm (NOT npm or yarn - always pnpm)
## Architecture
- Routes live in /src/routes, controllers in /src/controllers
- Services handle all business logic - keep routes thin
- Database queries belong in /src/repositories only
- Shared types live in /src/types/index.ts
## Code Style
- Use async/await - never raw Promises or callbacks
- Prefer named exports over default exports
- Error handling: use our custom AppError class, never throw strings
- All API responses must use the sendResponse() helper from /src/utils/response.ts
## Testing Rules
- Tests require a running Redis instance on localhost:6379
- Run `pnpm run test:db:reset` before integration tests
- Test files mirror the source file path: src/services/auth.ts → tests/services/auth.test.ts
## Never Touch
- /src/config/production.ts - production config only
- /migrations - never edit migrations, create new ones
- .env.production - this file should never be read or modified
The cascade and override rules:
Claude loads all applicable CLAUDE.md files and layers them together. More specific files take priority on conflicts. A /src/api/CLAUDE.md rule beats a root CLAUDE.md rule for files inside /src/api/.
# Bootstrap CLAUDE.md for a new project — Claude analyzes your codebase
# and writes a first draft
> /init

# Open any loaded CLAUDE.md file for editing
> /memory

# Quick-add to the most relevant CLAUDE.md in one keystroke
> # always use our custom logger, never console.log
The golden rule for CLAUDE.md: If you’ve corrected Claude on something twice, it belongs in CLAUDE.md. If you'd want Claude to know it six months from now, it belongs in CLAUDE.md. If it might change next week, keep it in a prompt.
Concept 2: Memory — How Claude Learns Without You Writing Anything
CLAUDE.md is memory you write. Auto memory is memory Claude writes for itself.
As you work — correcting Claude, establishing patterns, telling it what you prefer — Claude notices what’s worth remembering and saves it automatically. Build commands, debugging insights, architecture decisions, style preferences, workflow quirks. You don’t have to do anything. Claude builds its own knowledge base of your project.
How auto memory works:
# Claude saves automatically as it learns
# You don't trigger it — Claude decides what's worth keeping
# To see everything Claude has saved:
> /memory

# → Opens the auto memory folder - plain Markdown files you can read,
#   edit, or delete
# To save something specific right now:
> Remember that our staging environment uses port 4000, not 3000

# Claude writes it to auto memory immediately
# The # shortcut - fastest way to add memory mid-session:
> # always destructure props in React components, never use props.x
# Instantly saved, available in every future session
The two memory types, side by side:
CLAUDE.md Auto Memory Written by You Claude Best for Project rules, architecture, team conventions Learned habits, corrections, environment details Lives at ./CLAUDE.md (or hierarchy) ~/.claude/memory/ Format You control the structure Claude's own notes Override Edit the file manually Edit, delete, or correct in /memory
Auto memory requires Claude Code v2.1.59 or later. Check yours with claude --version. It's on by default.
# Toggle auto memory for a project
> /memory
# → Use the auto memory toggle in the interface

# Or set it in settings.json:
# { "autoMemoryEnabled": false }
The insight: Think of CLAUDE.md and auto memory as two halves of the same brain. You write the rules you know upfront. Claude fills in everything it discovers while working. Together, they eliminate re-onboarding.
Concept 3: Living Docs — The Project Memory Layer You Own and Version-Control
CLAUDE.md holds the rules for how to work. Auto memory holds what Claude learns while working. But there's a third layer most developers miss: documentation that captures what has actually been built.
Living docs are regular Markdown files — committed to your repo, evolving alongside your code — that Claude reads and updates as it works. Think docs/architecture.md, docs/features/payments.md, docs/decisions/ADR-001-why-prisma.md. Not generated docs. Not comments. Deliberate, structured files that describe your system at a level that survives context resets, team changes, and months of development.
The two things that make this powerful:
1. Scoped @ references = precision context loading
Instead of Claude reading your entire codebase to understand a feature, you point it directly at the relevant doc. One file, loaded intentionally, containing exactly what’s needed. Zero wasted tokens on everything else.
# Without living docs — Claude has to infer everything from source
> Add refresh token support to the auth system

# With living docs - Claude starts with full feature context
> Review @./docs/features/auth.md and add refresh token support

# Scope tightly for maximum token efficiency
> Using only @./docs/features/payments.md as context,
  add webhook retry logic to the payment service
2. Claude updates the doc as it builds
This is the part that compounds. Instead of docs that go stale the moment the code changes, you instruct Claude to keep them current as part of the task.
# Build and document in one instruction
> Implement the OAuth callback handler, then update
  @./docs/features/auth.md to reflect the new flow

# Capture decisions while they're fresh
> We just switched from JWT to session tokens. Update
  @./docs/decisions/ADR-002-auth-strategy.md with the
  rationale and tradeoffs we discussed

# After a big refactor
> Update @./docs/architecture.md - the payment service
  is now event-driven, not request-response
A minimal living docs structure that works:
docs/
├── architecture.md          # System design, data flow, service boundaries
├── features/
│   ├── auth.md              # How auth works end-to-end
│   ├── payments.md          # Payment service, webhooks, retry logic
│   └── notifications.md     # Email/SMS, queue, templates
├── decisions/
│   ├── ADR-001-prisma.md    # Why Prisma over raw SQL
│   └── ADR-002-auth.md      # JWT vs sessions decision
└── api-contracts.md         # Endpoint specs, request/response shapes
The pattern that makes it stick:
End every significant session with a doc update instruction. Make it a reflex.
# End of session habit:
> Before we close — update @./docs/features/auth.md
  to reflect everything we built today

# Or instruct Claude upfront so it happens automatically:
> As we build, keep @./docs/features/payments.md current.
  Update it after each significant change.
The compounding effect: Three months into a project, a new teammate (or a new Claude session) can read docs/features/auth.md and understand the entire auth system in two minutes. No archaeology through git history. No asking the person who built it. The docs are the system memory that outlasts any single context window.
This is what separates a codebase Claude can reason about deeply from one it has to re-discover every session.
Concept 4: Compact Context — The Skill That Saves Sessions (and Money)
From Section 1, you know the context window is Claude’s working memory — and that it degrades as it fills up. Compact context is your primary tool for managing it.
/compact compresses the entire conversation history into a dense, structured summary — preserving decisions made, tasks completed, and the current state of work, while dropping the verbose back-and-forth that's no longer needed. The result: a dramatically smaller context with the essential knowledge intact.
# Run compact manually — do this when context usage hits ~50-60%
> /compact

# Run it with a custom focus (preserves what matters most for next steps)
> /compact Focus on the auth refactor - we are about to start the token refresh logic

# Check your current context before deciding
> /context
# → Shows: Model: Sonnet | Ctx: 142.5k | Cost: $3.44 | Ctx(u): 71%

# Auto-compact (set a threshold - Claude compresses automatically)
# In settings.json:
# { "autoCompact": true, "autoCompactThreshold": 0.6 }
When to use /compact vs /clear:
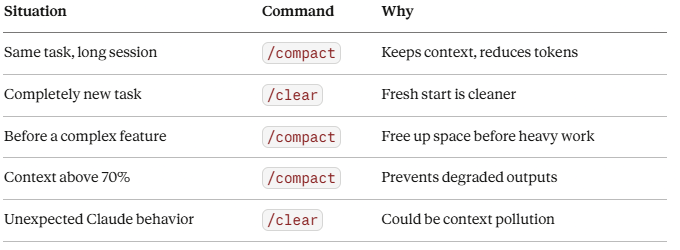
Situation Command Why Same task, long session /compact Keeps context, reduces tokens Completely new task /clear Fresh start is cleaner Before a complex feature /compact Free up space before heavy work Context above 70% /compact Prevents degraded outputs Unexpected Claude behavior /clear Could be context pollution
Compact is also your biggest cost lever.
Context grows every turn — your prompts, Claude’s responses, file reads, tool results all accumulate. Once you compact, that history is compressed by 60–80%. Every future message in the session costs significantly less.
A practical rule: if you wouldn’t read the last 30 messages of a session to understand where you are, Claude probably doesn’t need them either. Compact it.
# Build compacting into your session rhythm:
# Start → work → compact at 50% → work → compact again → finish
# This keeps quality high and cost low throughout

# After compacting, always verify Claude still knows key decisions:
> What are we building and where did we leave off?
Concept 5: Model Selection — The Right Tool for Each Job
Claude Code defaults to Sonnet, which is the right choice for most work. But knowing when to switch models — and how — is the difference between getting good results and getting the best results at the right cost.
The three models and their sweet spots:

Three ways to switch models:
# 1. The /model command — instant, no restart needed
> /model
# → Interactive menu, pick your model, takes effect immediately

# 2. The --model flag - sets model for the entire session
$ claude --model claude-opus-4-6

# 3. Environment variable - makes it your new default
export CLAUDE_DEFAULT_MODEL="claude-sonnet-4-6"

# 4. Set it in settings.json - persistent default for a project
# { "model": "claude-sonnet-4-6" }

# Check what model you're currently using
> /status
A model-switching workflow that works:
# Phase 1 — Exploration (cheap, fast)
$ claude --model claude-haiku-4-5-20251001
> Map out all the files I need to touch to add OAuth support

# Phase 2 - Architecture (powerful, deliberate)
> /model  # switch to Opus
> Review the plan above. What are the risks? What am I missing?

# Phase 3 - Implementation (balanced, default)
> /model  # switch back to Sonnet
> Now implement it, starting with the OAuth callback handler

# Subagents doing repetitive work? Keep them on Haiku to save 80% vs Sonnet
One important note: On Claude Pro plans, Opus requires enabling and purchasing extra usage. Sonnet and Haiku are available on all paid plans.
Concept 6: File Access Control — Telling Claude What It Can and Cannot Touch
By default, Claude Code can read and write any file in your project. That’s useful for broad tasks. But for production codebases, sensitive configs, and shared repositories, you want precise control over what’s accessible.
File access control in Claude Code works at two levels: what Claude can read (context gathering) and what Claude can write (file modification). Both are configurable with glob patterns.
Configuring file access in settings.json:
{
  "permissions": {
    "allow": [
      "Read(**)",
      "Write(src/**)",
      "Write(tests/**)",
      "Bash(npm run test:*)",
      "Bash(git status)",
      "Bash(git diff*)",
      "Bash(git add*)",
      "Bash(git commit*)"
    ],
    "deny": [
      "Read(.env)",
      "Read(.env.*)",
      "Read(.env.production)",
      "Write(production.config.*)",
      "Write(migrations/**)",
      "Write(*.lock)",
      "Bash(rm -rf*)",
      "Bash(curl * | bash)",
      "Bash(wget * | bash)"
    ]
  }
}
How rules evaluate (first match wins):
deny → ask → allow
Deny rules are checked first. If a path matches a deny rule, Claude stops — no further evaluation. This means you can build a wide allow and then carve out specific exceptions with deny.
# Granular patterns you can use:
"Read(src/services/payment*)"    # Only payment service files
"Write(src/**/*.test.ts)"        # Only test files
"Bash(docker *)"                 # Any docker command
"Bash(git commit -m *)"          # Only git commits with a message flag
"Read(!**/node_modules/**)"      # Everything EXCEPT node_modules
The settings.local.json pattern:
Keep team-wide rules in .claude/settings.json (commit this). Keep personal preferences and experimental rules in .claude/settings.local.json (gitignore this). This way your team shares the same safety rules while you have flexibility to adjust your own session behavior.
# Example settings.local.json — personal preferences, not committed:
{
  "permissions": {
    "allow": [
      "Bash(pbcopy*)",
      "Bash(open *)"
    ]
  }
}
The principle: Protect production, migration files, and environment secrets with deny rules you never have to think about again. The cost is a few minutes of setup. The benefit is never accidentally letting Claude touch something it shouldn't.
Concept 7: Flags — The Session Controls You’ll Use Every Day
CLI flags are the levers you reach for before a session starts — or when you want to change how a session behaves at launch. These aren’t one-time use options; they’re part of a fluent, powerful workflow once you know them cold.
The flags you’ll use constantly:
# Resume last session (most used flag period)
$ claude -c

# Resume and immediately add context or instruction
$ claude -c -p "continue the auth refactor, we're now adding refresh tokens"

# Resume a specific named session
$ claude --resume payments-v2

# Fork a session - explore a risky approach without losing your current state
$ claude --resume auth-refactor --fork-session "try approach B: stateless JWT"

# One-shot mode - run a task, print output, exit (great for scripts)
$ claude -p "summarize all TODOs in this repo as a markdown list"

# Pipe content directly into Claude
$ cat error.log | claude -p "what's the root cause?"
$ git diff HEAD~1 | claude -p "review these changes for bugs"

# Append extra system-level instructions for this session only
$ claude --append-system-prompt "today we are only working in TypeScript strict mode"

# Set model for the session
$ claude --model claude-opus-4-6

# Control which tools are available this session
$ claude --allowedTools "Read,Write,Bash(npm run*)"
$ claude --disallowedTools "Bash(rm*)"

# Add directories to Claude's working context (multi-repo work)
$ claude --add-dir ../shared-utils --add-dir ../api-gateway
Flags for CI/CD and automation:
# Non-interactive mode — no prompts, no approval requests
$ claude --print --no-interactive "run all linters and output results"

# Output as JSON (for piping into other tools)
$ claude -p --output-format json "list all exported functions in src/"

# Disable verbose output
$ claude -p --quiet "check if all tests pass"
The /status command — your session dashboard:
> /status
# → Shows: current model, context usage, token count, session ID,
#   cost so far, active permissions, and memory status
# Run this at the start of any resumed session to re-orient fast
Building flag patterns into aliases:
# In your .zshrc or .bashrc:
alias cc="claude"                                       # quick launch
alias ccr="claude -c"                                   # resume last session
alias ccp="claude -p"                                   # one-shot mode
alias cco="claude --model claude-opus-4-6"             # launch with Opus
alias ccs="claude --dangerously-skip-permissions"       # sandbox only

# Launch a new feature session with project context
alias ccf="claude --append-system-prompt 'Focus only on the task at hand. No extra changes.'"
The developers who get the most out of Claude Code treat these flags as muscle memory — not as commands to look up.
How These 7 Concepts Connect
Here’s the updated wiring diagram — Section 1 foundations on the left, Section 2 personalization layered on top:
Foundation (Section 1)        Personalization (Section 2)
─────────────────────         ──────────────────────────────
Terminal                  →   Flags control how sessions launch
Prompts                   →   CLAUDE.md reduces what you need to prompt
Permissions               →   File Access Control specifies what's touchable
Tools                     →   Model Selection matches the tool to the task
Context Window            →   Compact Context keeps the window clean
History & Resume          →   Memory (auto + manual) persists across sessions
Token Cost                →   Living Docs + scoped @refs cut wasted tokens
Three memory layers working together:
CLAUDE.md       →  Rules you write upfront (how to work)
Auto Memory     →  Habits Claude learns while working (corrections, patterns)
Living Docs     →  What was actually built (features, decisions, architecture)
The system compounds. A well-written CLAUDE.md means shorter prompts. Shorter prompts mean less context consumed. Living docs mean Claude starts with deep feature context without reading the entire codebase. Auto memory means fewer corrections. /compact at the right moment means consistent quality all session long. File access rules mean no accidents.
This is what “making Claude personal” actually means — not just telling it your preferences once, but building a system where those preferences persist, compound, and require zero maintenance over time.
Your Action Plan
- Run /init — Let Claude bootstrap a CLAUDE.md for your current project. Then edit it to match reality.
- Add your first rule with # — Next time you correct Claude, use # always [your rule] to save it instantly.
- Create one living doc — Pick your most complex feature and write docs/features/[feature].md. Have Claude populate it: > Read the auth system and write docs/features/auth.md.
- Start using @ references — On your next task, reference the relevant doc directly instead of describing the feature from scratch.
- Set your deny list — Open .claude/settings.json and block .env.*, migrations/, and any production configs.
- Build two aliases — At minimum: ccr for resume, ccp for one-shot. You'll use them every day.
- Practice /compact — Open a long session, hit /context, and compact when you hit 50%. Feel the difference.
What’s Next
Section 3: Extending Claude’s Reach covers CLAUDE.md at scale, Hooks, MCP Servers, Slash Commands, and Subagents — the features that let Claude Code connect to external systems, automate repetitive actions, and orchestrate complex multi-step workflows across your entire stack.
Which of these 7 concepts do you want a dedicated deep-dive on? Drop a comment below. The most-requested one becomes the next standalone post.
Follow me on LinkedIn for the Section 2 cheat sheet and the rest of the series.
Resources:
- Official memory docs: docs.anthropic.com/en/docs/claude-code/memory
- Model configuration: support.claude.com — Claude Code model configuration
- Settings reference: docs.anthropic.com/en/docs/claude-code/settings
- Previous: Section 1 — The Foundations
- Next: Section 3 — Extending Claude’s Reach
Claude Code Section 2: Making Claude Personal — 7 Concepts That Turn a Generic Tool Into Your… was originally published in Towards AI on Medium, where people are continuing the conversation by highlighting and responding to this story.