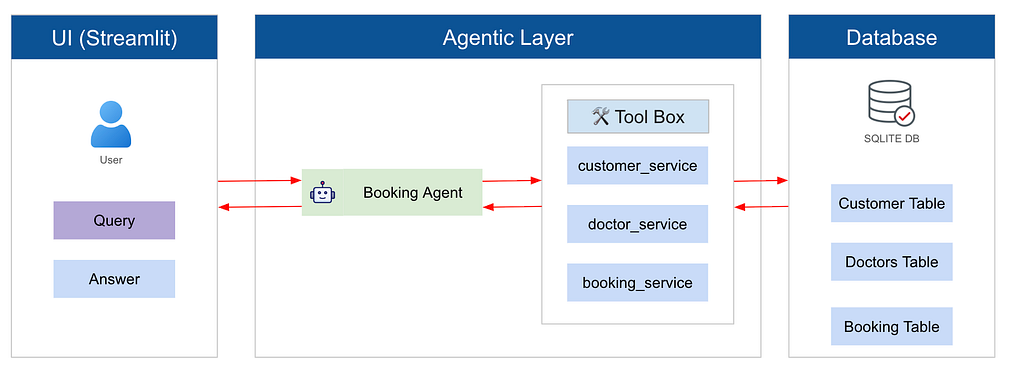
End to end implementation of a Agentic AI based customer service or booking chatbot using LangGraph & Open AI model.

Introduction
Healthcare administration is often tedious and time-consuming. From scheduling appointments to managing doctor availability, clinics face numerous organizational challenges. Imagine a system that automates the entire appointment booking process through a conversational AI interface.
This article explores how to build an Intelligent Clinic Booking Chatbot using LangGraph for state-driven agent orchestration, OpenAI’s gpt 4o-mini for natural language understanding, SQLite for data persistence, and Streamlit for an intuitive user interface.
In this comprehensive guide, we’ll walk through the complete architecture of the Clinic booking system, understanding each component, its purpose, and how they work together to create a seamless booking experience.
Problem Statement
Clinics often rely on manual processes or fragmented systems to manage patient appointments. This leads to long waiting times, scheduling conflicts, inefficient staff workload, and poor patient experience. Patients may struggle to find available doctors, select appropriate specialties, or book appointments easily. Clinics need an automated, intelligent system that can handle appointment scheduling through natural conversation while maintaining accurate records of doctors, patients, and bookings.
Solution
The proposed solution is an AI-powered clinic booking chatbot that automates the appointment scheduling process using modern AI and web technologies.
The system uses LangGraph to manage a multi-step conversational workflow, OpenAI’s gpt-4o-mini to understand user requests in natural language, SQLite to store doctors, patients, and appointment data, and Streamlit to provide an interactive chat interface.
Through a guided conversation, the chatbot:
- Greets the user and asks if they want to book an appointment.
- Shows available medical specialties.
- Displays the doctor and available time slots.
- Collects patient details (name and phone).
- Confirms and stores the appointment in the database.
This solution reduces administrative workload, improves booking efficiency, prevents scheduling conflicts, and provides a seamless patient experience through an AI conversational interface.
Let’s get started.
A sneak-peak into what we are going to build:

The complete end to end code can be referred to my github repo. Please give star the repo as I am putting more Agentic AI Usecases in the same repo.
Setup
- Create Virtual Environments:
Mac / Linux / Windows
python -m venv .venv
2. Activate the Virtual Environment
Mac / Linux
source .venv/bin/activate
Windows (PowerShell)
.venv\Scripts\Activate.ps1
Windows (Command Prompt)
.venv\Scripts\activate
After activation, your terminal should show something like:
(.venv) your-folder-name %
3. Install Dependencies
Here is the requirements.txt file:
streamlit>=1.50.0
python-dotenv==1.0.0
pydantic==2.12.5
pandas==2.3.3
python-dateutil==2.8.2
langgraph>=1.0.7
openai>=2.16.0
pygraphviz==1.14
In the terminal,
cd clinic-agent
pip install -r requirements.txt
4. Set up Environment Variables:
Create a .env file in the clinic-agent directory:
OPENAI_API_KEY=your_openai_api_key_here
Part 1: Database Setup (data/db.py)
The foundation of any booking system is a robust database. The clinic uses SQLite with three main tables: doctors, customers, and bookings.
These tables work together to store doctor information, patient details, and scheduled appointments.
The schema is designed to keep the data structured, relational, and easy to query during the booking process.
1. Doctors Table
The Doctors table stores information about the doctors available in the clinic.
Each record represents a doctor along with their specialization and working hours. This data helps the chatbot identify which doctor should be suggested when a user selects a particular specialty.
Key Fields:
doctor_id: Unique identifier for each doctor
doctor_nameName of the doctor
speciality: Medical specialty (Dermatologist, Pediatrician, etc.)
office_timing: Doctor’s available working hours
For this problem statement, we have taken 5 specialties:
- Dermatologist
- Orthopedic
- General Physician
- Pediatrician
- ENT Specialist
I have mentioned hypothetical names and office timing for each doctor in below table. Feel free to extend this to more specialties.

2. Customers Table
The Customers table stores patient information required for booking appointments.
Whenever a user books an appointment, the system checks whether the customer already exists (based on phone number). If not, a new customer record is created.
Key Fields:
customer_id : Unique identifier for the patient
name : Patient’s name
phone : Contact number of the patient
3. Booking Table
The Bookings table is the core table that stores appointment details. Each booking connects a doctor and a customer at a specific date and time.
Key Fields:
booking_id : Unique ID for each appointment
doctor_id : References the doctor handling the appointment
customer_id : References the patient who booked
appointment_date : Date of the appointment
appointment_time : Time of the appointment
status : Booking status (Confirmed, Cancelled, etc.)
4. Creating the Database
We first define the database tables and their schema as mentioned above and create the “clinic.db” database.
# data/db.py - Database initialization and operations

import sqlite3
import os
from datetime import datetime, timedelta

DB_PATH = os.path.join(os.path.dirname(__file__), "clinic.db")

def get_connection():
    """Get a database connection."""
    return sqlite3.connect(DB_PATH)

def init_db():
    """Initialize the database with tables and sample data."""
    conn = get_connection()
    cursor = conn.cursor()

    # Doctors table
    cursor.execute("""
        CREATE TABLE IF NOT EXISTS doctors (
            doctor_id TEXT PRIMARY KEY,
            doctor_name TEXT NOT NULL,
            speciality TEXT NOT NULL,
            office_timing TEXT NOT NULL
        )
    """)

    # Customers table
    cursor.execute("""
        CREATE TABLE IF NOT EXISTS customers (
            customer_id TEXT PRIMARY KEY,
            name TEXT NOT NULL,
            phone TEXT NOT NULL
        )
    """)

    # Bookings table
    cursor.execute("""
        CREATE TABLE IF NOT EXISTS bookings (
            booking_id TEXT PRIMARY KEY,
            doctor_id TEXT NOT NULL,
            customer_id TEXT NOT NULL,
            appointment_date TEXT NOT NULL,
            appointment_time TEXT NOT NULL,
            status TEXT NOT NULL,
            FOREIGN KEY (doctor_id) REFERENCES doctors (doctor_id),
            FOREIGN KEY (customer_id) REFERENCES customers (customer_id)
        )
    """)

    # Insert sample doctors
    doctors = [
        ("D1", "Dr. Anil Sharma", "General Physician", "10:00-14:00"),
        ("D2", "Dr. Neha Verma", "Dermatologist", "11:00-16:00"),
        ("D3", "Dr. Rohit Mehta", "Orthopedic", "09:00-13:00"),
        ("D4", "Dr. Kavita Rao", "Pediatrician", "10:00-15:00"),
        ("D5", "Dr. Sanjay Iyer", "ENT Specialist", "12:00-17:00"),
    ]

    for doctor in doctors:
        cursor.execute(
            "INSERT OR IGNORE INTO doctors (doctor_id, doctor_name, speciality, office_timing) VALUES (?, ?, ?, ?)",
            doctor
        )

    conn.commit()
    conn.close()

if __name__ == "__main__":
    print("Initializing database...")
    init_db()
    print("Database initialized successfully.")
Run the database initialization script db.py by running below command in your terminal:
cd clinic-agent
python data/db.py
This will create the clinic.db with the 3 tables.
Part 2: Service Layer (Tools for the Agent)
The service layer contains the business logic that connects the agent to the database.
Instead of directly querying the database, the LangGraph agent calls service functions to perform tasks such as retrieving doctor information, generating available time slots, and confirming bookings.
In an agent-based architecture, these services can be considered tools that the agent uses to execute actions, while the agent itself focuses on managing the conversation flow.
Doctor Service (services/doctor_service.py)
The doctor service abstracts doctor-related operations and provides business logic for managing specialties, doctors, and time slots. It’s tasks are:
- Retrieves the list of available medical specialties from the database.
- Fetches doctor details based on the selected specialty.
- Generates available time slots using the doctor’s office timing.
- Converts display time slots (e.g., 2:00 PM) into 24-hour format for database storage.
# services/doctor_service.py - Doctor operations

from data.db import get_all_doctors, get_doctor_by_speciality, get_doctor_by_id

def get_specialities_list():
    """Get list of all specialities."""
    doctors = get_all_doctors()
    # Return unique specialities
    return list(dict.fromkeys([doc[2] for doc in doctors]))

def get_doctor_info(speciality):
    """Get doctor information by speciality."""
    doctor = get_doctor_by_speciality(speciality)
    if doctor:
        return {
            "doctor_id": doctor[0],
            "doctor_name": doctor[1],
            "speciality": doctor[2],
            "office_timing": doctor[3]
        }
    return None

def generate_time_slots(office_timing):
    """Generate hourly time slots from office timing string.

    Args:
        office_timing: String like "11:00-16:00"

    Returns:
        List of time slots like ["11:00 AM", "12:00 PM", ...]
    """
    start_time, end_time = office_timing.split("-")
    start_hour = int(start_time.split(":")[0])
    end_hour = int(end_time.split(":")[0])

    slots = []
    for hour in range(start_hour, end_hour):
        if hour < 12:
            suffix = "AM"
            display_hour = hour if hour > 0 else 12
        elif hour == 12:
            suffix = "PM"
            display_hour = 12
        else:
            suffix = "PM"
            display_hour = hour - 12
        slots.append(f"{display_hour}:00 {suffix}")

    return slots

def parse_time_slot(slot_str):
    """Parse time slot string to 24-hour format.

    Args:
        slot_str: String like "1:00 PM"

    Returns:
        String like "13:00"
    """
    time_part, suffix = slot_str.split(" ")
    hour, minute = time_part.split(":")
    hour = int(hour)

    if suffix == "PM" and hour != 12:
        hour += 12
    elif suffix == "AM" and hour == 12:
        hour = 0

    return f"{hour:02d}:{minute}"
Booking Service (services/booking_service.py)
The booking service handles customer management and booking operations. It’s tasks are:
- Creates a new customer record or retrieves an existing one using the phone number.
- Checks already booked appointment slots for a doctor on a specific date.
- Filters and returns available time slots for booking.
- Generates a unique booking ID and stores the appointment in the database.
- Confirms and saves the final appointment details (doctor, patient, date, time).
# services/booking_service.py - Booking operations

import uuid
from datetime import datetime
from data.db import (
    create_customer,
    create_booking,
    get_customer_by_phone,
    get_bookings_by_doctor_and_date,
    get_booking_by_id
)
from services.doctor_service import parse_time_slot

def get_or_create_customer(name, phone):
    """Get existing customer or create new one."""
    customer = get_customer_by_phone(phone)
    if customer:
        return customer[0]  # Return customer_id

    customer_id = f"CUST-{uuid.uuid4().hex[:6].upper()}"
    create_customer(customer_id, name, phone)
    return customer_id

def get_available_slots(doctor_id, office_timing):
    """Get available time slots for a doctor for today.

    Args:
        doctor_id: Doctor ID
        office_timing: Office timing string like "11:00-16:00"

    Returns:
        List of available time slots
    """
    from services.doctor_service import generate_time_slots

    today = datetime.now().strftime("%Y-%m-%d")
    all_slots = generate_time_slots(office_timing)

    # Get booked slots
    booked_times = get_bookings_by_doctor_and_date(doctor_id, today)

    # Filter out booked slots
    available = []
    for slot in all_slots:
        slot_24h = parse_time_slot(slot)
        if slot_24h not in booked_times:
            available.append(slot)

    return available

def confirm_booking(doctor_id, customer_name, customer_phone, time_slot, appointment_date=None):
    """Confirm a booking.

    Args:
        doctor_id: Doctor ID
        customer_name: Customer name
        customer_phone: Customer phone
        time_slot: Time slot like "1:00 PM"
        appointment_date: Optional date in YYYY-MM-DD format. Defaults to today.

    Returns:
        Booking ID
    """
    # Get or create customer
    customer_id = get_or_create_customer(customer_name, customer_phone)

    # Generate booking ID
    booking_id = f"BKG-{uuid.uuid4().hex[:6].upper()}"

    # Format appointment time
    if not appointment_date:
        appointment_date = datetime.now().strftime("%Y-%m-%d")
    appointment_time = parse_time_slot(time_slot)

    # Create booking
    create_booking(booking_id, doctor_id, customer_id, appointment_date, appointment_time)

    return booking_id
Testing the service
# test/test_service.py - to test the services created

from pathlib import Path
import sys

# Allow running this file directly: `python test/test_service.py`.
PROJECT_ROOT = Path(__file__).resolve().parents[1]
if str(PROJECT_ROOT) not in sys.path:
    sys.path.insert(0, str(PROJECT_ROOT))

from services.doctor_service import get_specialities_list, generate_time_slots
from services.booking_service import confirm_booking

# Get all specialities
specialities = get_specialities_list()
print("Available specialities:", specialities)

# Generate time slots for a doctor (11:00 AM - 4:00 PM)
slots = generate_time_slots("11:00-16:00")
print("Available slots:", slots)

# Confirm a booking
booking_id = confirm_booking(
    doctor_id="D1",
    customer_name="John Doe",
    customer_phone="9876543210",
    time_slot="2:00 PM"
)
print(f"Booking confirmed: {booking_id}")
In your terminal, run below command:
cd clinic-agent
python test_service.py
This will print below in the terminal:
(.venv) (base) my-mac clinic-agent % python test_service.py
Available specialities: ['General Physician', 'Dermatologist', 'Orthopedic', 'Pediatrician', 'ENT Specialist']
Available slots: ['11:00 AM', '12:00 PM', '1:00 PM', '2:00 PM', '3:00 PM']
Booking confirmed: BKG-C4F60A
Great!! Our services are working fine!!
Let’s now move on to the most crucial part. the Agentic Layer
Part 3: Agentic Layer
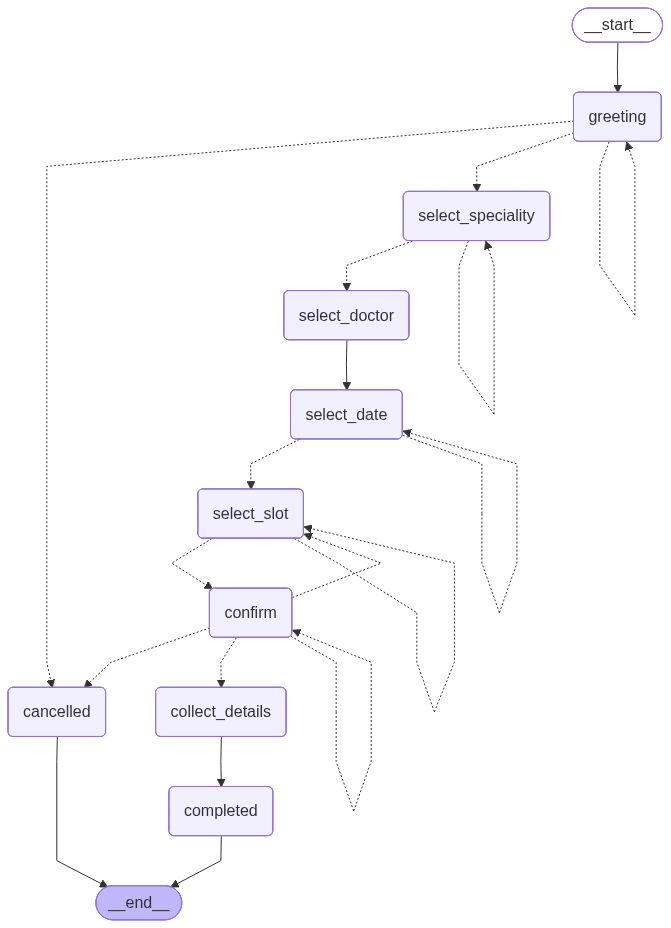
The core of the chatbot is a LangGraph-based Agent that manages the booking workflow through multiple stages.
Booking State:
We first define the booking state. It is the structured memory that stores all information during the booking conversation.
Key Responsibilities:
- tracks the current conversation stage (e.g., greeting, selecting doctor) to guide the workflow
- stores user selections such as speciality, doctor, and time slot
- maintains customer and booking details so the agent can complete the appointment process
# agents/booking_agent.py - LangGraph agent implementation

from typing import TypedDict, Annotated, List, Optional
from langgraph.graph import StateGraph, END
from openai import OpenAI
import os
from dotenv import load_dotenv

load_dotenv()
client = OpenAI(api_key=os.getenv("OPENAI_API_KEY"))

class BookingState(TypedDict):
    """State for the booking conversation."""
    messages: List[dict]                    # Chat history
    stage: str                               # greeting, select_speciality, select_doctor, etc.
    selected_speciality: Optional[str]      # Chosen medical specialty
    selected_doctor: Optional[dict]         # Selected doctor details
    selected_date: Optional[str]            # Appointment date
    selected_slot: Optional[str]            # Time slot
    customer_name: Optional[str]            # Customer name
    customer_phone: Optional[str]           # Customer phone
    booking_id: Optional[str]               # Confirmation ID
    available_options: List[str]            # UI options

def create_initial_state():
    """Create initial state for the conversation."""
    return {
        "messages": [],
        "stage": "greeting",
        "selected_speciality": None,
        "selected_doctor": None,
        "selected_date": None,
        "selected_slot": None,
        "customer_name": None,
        "customer_phone": None,
        "booking_id": None,
        "available_options": []
    }
LLM Helper Function
We now define call_llm function, that provides a centralized way for communicating with the OpenAI model.
Key Responsibilities:
- sends system and user prompts to the language model
- returns the generated response used by the agent
- keeps LLM interactions consistent and reusable across the agent code
# agents/booking_agent.py - LangGraph agent implementation
def call_llm(
    system_prompt: str,
    user_prompt: str,
    *,
    model: str = "gpt-4o-mini",
    temperature: float = 0,
    max_tokens: int = 50,
) -> str:
    """
    Centralized helper for all LLM calls.
    Returns the assistant's response
    """
    try:
        response = client.chat.completions.create(
            model=model,
            messages=[
                {"role": "system", "content": system_prompt},
                {"role": "user", "content": user_prompt},
            ],
            temperature=temperature,
            max_tokens=max_tokens,
        )
        return response
    except Exception as e:
        print(f"LLM call error: {e}")
        return ""
Agent Nodes
Represent individual steps that handle specific tasks in the booking workflow.
Key responsibilities:
- manage stages like greeting, selecting speciality, and confirming bookings
- process user input and update the conversation state
- allow the chatbot workflow to remain modular and easy to manage
In the agent, we define multiple nodes, each handling a specific stage:
1. greeting_node: Welcomes the user and asks if they want to book
2. select_speciality_node: Shows available specialties
3. select_doctor_node: Shows doctors for the selected specialty
4. select_date_node: Lets users pick a date
5. select_slot_node: Shows available time slots
6. confirm_node: Asks for confirmation
7. collect_details_node: Collects customer name and phone
8. completed_node: Confirms the booking
9. cancelled_node: Handles cancellation
Building the Graph
Let’s now construct the LangGraph workflow by connecting agent nodes into a state-driven conversation flow.
Key responsibilities of build_booking_graph function are:
- adds nodes that represent different booking stages
- defines conditional transitions between nodes
- creates the overall conversation path for the chatbot
# agents/booking_agent.py - LangGraph agent implementation
from langgraph.checkpoint.memory import MemorySaver

def build_booking_graph():
    """Build the LangGraph workflow."""
    workflow = StateGraph(BookingState)

    # Add all nodes
    workflow.add_node("greeting", greeting_node)
    workflow.add_node("select_speciality", select_speciality_node)
    workflow.add_node("select_doctor", select_doctor_node)
    workflow.add_node("select_date", select_date_node)
    workflow.add_node("select_slot", select_slot_node)
    workflow.add_node("confirm", confirm_node)
    workflow.add_node("collect_details", collect_details_node)
    workflow.add_node("completed", completed_node)
    workflow.add_node("cancelled", cancelled_node)

    # Set entry point
    workflow.set_entry_point("greeting")

    # Add conditional edges based on routing
    workflow.add_conditional_edges(
        "greeting",
        llm_router,
        {
            "greeting": "greeting",
            "select_speciality": "select_speciality",
            "cancelled": "cancelled"
        }
    )

    # Similar conditional edges for other nodes...

    # Final edges to END
    workflow.add_edge("completed", END)
    workflow.add_edge("cancelled", END)

    # Compile with checkpointer for session management
    return workflow.compile(checkpointer=MemorySaver())

# Create the compiled graph
booking_graph = build_booking_graph()
Now let’s visualize the graph using save_langgraph_flow.py
#agents/save_langgraph_flow.py
"""Save the clinic booking LangGraph flow to png format in this folder."""


from pathlib import Path
import sys


# Ensure imports work whether the script is run from project root or this folder.
AGENTS_DIR = Path(__file__).resolve().parent
PROJECT_ROOT = AGENTS_DIR.parent
if str(PROJECT_ROOT) not in sys.path:
    sys.path.insert(0, str(PROJECT_ROOT))

from agents.booking_agent import booking_graph  # noqa: E402


def save_graph_files() -> None:
    """Export graph as PNG."""
    graph = booking_graph.get_graph()

    png_path = AGENTS_DIR / "langgraph_flow.png"
    png_data = graph.draw_mermaid_png()
    png_path.write_bytes(png_data)
    print(f"Saved PNG flow to: {png_path}")


if __name__ == "__main__":
    save_graph_files()
To run above file, please use terminal below command:
cd clinic-agent
python save_langgraph_flow.py
This will save langgraph_flow.py in agents folder:
Process Message:
This function handles user input and runs it through the LangGraph workflow.
Key activities:
- receives messages from the user interface
- passes the message through the agent graph for processing
- returns the updated state and assistant response
# agents/booking_agent.py - LangGraph agent implementation
def process_message(state: BookingState, user_message: str, thread_id: str = "default_session") -> BookingState:
    """Process a user message through the booking graph."""
    config = {"configurable": {"thread_id": thread_id}}

    # Check if the graph is currently interrupted
    current_state = booking_graph.get_state(config)

    if current_state.tasks and current_state.tasks[0].interrupts:
        # Resume the graph with the user's message
        result = booking_graph.invoke(Command(resume=user_message), config=config)
    else:
        # No interrupt, so start/continue normally
        # Add user message to state (unless it's an initial trigger)
        if user_message.lower() != "hi" or state["messages"]:
            # Avoid duplicate user messages if already added
            if not state["messages"] or state["messages"][-1].get("content") != user_message:
                state["messages"].append({
                    "role": "user",
                    "content": user_message
                })
        # Run the graph
        result = booking_graph.invoke(state, config=config)

    # Update available_options and ensure message is in history
    snapshot = booking_graph.get_state(config)
    if snapshot.tasks and snapshot.tasks[0].interrupts:
        interrupt_value = snapshot.tasks[0].interrupts[0].value

        # Handle both dict and string interrupt values
        msg_content = ""
        options = []
        if isinstance(interrupt_value, dict):
            msg_content = interrupt_value.get("content", "")
            options = interrupt_value.get("available_options", [])
        else:
            msg_content = str(interrupt_value)

        # Ensure the interrupt message is in the chat history
        if msg_content:
            # Check if it was already added by the node
            last_msg_content = result["messages"][-1].get("content", "") if result["messages"] else ""
            if last_msg_content != msg_content:
                result["messages"].append({
                    "role": "assistant",
                    "content": msg_content,
                    "options": options
                })
            else:
                # If already added, just update it with options if missing
                result["messages"][-1]["options"] = options

        result["available_options"] = options
    else:
        # If not interrupted, use whatever set in state, or default to empty
        if "available_options" not in result:
            result["available_options"] = []

    return result
Testing the Agent
Let’s now test the agent.
# test/test_agent.py - test agent
# Initialize state

from pathlib import Path
import sys

# Allow running this file directly: `python test/test_agent.py`.
PROJECT_ROOT = Path(__file__).resolve().parents[1]
if str(PROJECT_ROOT) not in sys.path:
 sys.path.insert(0, str(PROJECT_ROOT))

from agents.booking_agent import create_initial_state, process_message


state = create_initial_state()

# Process messages
state = process_message(state, "Hi", thread_id="session_1")
print(state["messages"][-1]["content"])

state = process_message(state, "I want to book", thread_id="session_1")
print(state["available_options"])
In your terminal please run below command:
cd clinic-agent
python test/test_agent.py
it should be able to display the available options in the terminal.
Let’s now focus on the UI using streamlit.
Part 4: Streamlit UI
The Streamlit interface provides a beautiful, interactive chat experience for users.
Features:
- Real-time chat interface
- Clickable option buttons
- Session management with unique IDs
# ui/chat_ui.py - Streamlit chatbot interface

"""Streamlit UI for the clinic booking chatbot."""

import streamlit as st
from agents.booking_agent import create_initial_state, process_message
from data.db import init_db


def initialize_session():
    """Initialize session state."""
    if "state" not in st.session_state:
        st.session_state.state = create_initial_state()
    if "initialized" not in st.session_state:
        st.session_state.initialized = False
    if "session_id" not in st.session_state:
        import uuid
        st.session_state.session_id = str(uuid.uuid4())


def display_chat_history():
    """Display the chat history with persistent options and styling."""
    messages = st.session_state.state.get("messages", [])
    for i, message in enumerate(messages):
        if message["role"] == "assistant":
            with st.chat_message("assistant"):
                st.markdown(message["content"])

                # Show options if they exist
                options = message.get("options", [])
                if options:
                    # If this is the last message in history, show as clickable buttons
                    if i == len(messages) - 1 and st.session_state.state["stage"] not in ["completed", "cancelled"]:
                        st.markdown("---")
                        # Create columns for buttons
                        cols = st.columns(min(len(options), 3))
                        for idx, option in enumerate(options):
                            col_idx = idx % 3
                            with cols[col_idx]:
                                if st.button(option, key=f"btn_{i}_{idx}", use_container_width=True):
                                    handle_user_input(option)
                    else:
                        # For older messages, show options as pills/text to keep history
                        options_str = "  ".join([f"`{opt}`" for opt in options])
                        st.markdown(f"**Available options:** {options_str}")
        else:
            with st.chat_message("user"):
                st.markdown(message["content"])


def handle_user_input(user_input: str):
    """Handle user input and process through agent."""
    # Process the message
    st.session_state.state = process_message(
        st.session_state.state,
        user_input,
        thread_id=st.session_state.session_id
    )

    # Rerun to update UI
    st.rerun()


def run_chat_ui():
    """Run the chat UI."""
    # Page config
    st.set_page_config(
        page_title="CarePlus Clinic - Book Appointment",
        page_icon="🏥",
        layout="centered"
    )

    # Custom CSS for distinction between messages
    st.markdown("""
        <style>
        [data-testid="stChatMessageUser"] {
            flex-direction: row-reverse;
            text-align: right;
            background-color: #e0f2f1;
            border-radius: 15px 15px 0px 15px;
        }
        [data-testid="stChatMessageAssistant"] {
            background-color: #f5f5f5;
            border-radius: 15px 15px 15px 0px;
        }
        </style>
    """, unsafe_allow_html=True)

    # Initialize database
    init_db()

    # Initialize session
    initialize_session()

    # Header
    st.title("🏥 CarePlus Clinic")
    st.markdown("*Book your doctor appointment easily*")
    st.markdown("---")

    # Send initial greeting if not initialized
    if not st.session_state.initialized:
        st.session_state.state = process_message(
            st.session_state.state,
            "Hi",
            thread_id=st.session_state.session_id
        )
        st.session_state.initialized = True
        st.rerun()

    # Display chat history
    display_chat_history()

    # Chat input (only show if not completed)
    if st.session_state.state["stage"] not in ["completed", "cancelled"]:
        if prompt := st.chat_input("Type your message here..."):
            handle_user_input(prompt)
    else:
        # Show restart button after completion
        st.markdown("---")
        if st.button("🔄 Start New Booking", use_container_width=True):
            st.session_state.state = create_initial_state()
            st.session_state.initialized = False
            st.rerun()
Part 5: Application Entry Point
Now we define app.py which acts as the starting point that launches the entire chatbot application.
# app.py - Main entry point for the application

from ui.chat_ui import run_chat_ui

if __name__ == "__main__":
    run_chat_ui()
Running the Chatbot: Two Approaches
Approach 1: Streamlit Web Application
The easiest and most user-friendly way to run the chatbot.
To run the app, please run below command in your terminal:
streamlit run app.py
The chatbot will open at http://localhost:8501

Approach 2: Jupyter Notebook
For development, testing, and exploring the chatbot logic.
We import the required functions in the Jupyter Notebook:
# clinic-agent.ipynb
from services.doctor_service import get_specialities_list, get_doctor_info, generate_time_slots
from services.booking_service import confirm_booking
from agents.booking_agent import (
    BookingState,
    create_initial_state,
    build_booking_graph,
    process_message
)
Then we build the graph and visualize it in the notebook:
# clinic-agent.ipynb
# Initialize the booking graph
booking_graph = build_booking_graph()

## Visualize the booking graph structure
from IPython.display import Image, display

png_bytes = booking_graph.get_graph().draw_mermaid_png()
display(Image(png_bytes))
Run the Chatbot Session:
Now we run an interactive chabot session within the notebook.
# clinic-agent.ipynb
from langgraph.types import Command

def run_booking_session(graph, thread_id="notebook_session", reset=False):
    config = {"configurable": {"thread_id": thread_id}}

    # 1. Start or Reset logic
    current_state = graph.get_state(config)
    if reset or not current_state.values:
        print(f"--- {'🔄 Resetting' if reset else '🆕 Initializing'} Session ---")
        # Using invoke() here kicks off the 'greeting' node immediately
        graph.invoke(create_initial_state(), config=config)

    print("---⚕⚕ Starting CarePlus Booking Session ---")

    last_displayed_message_idx = -1  # Track which messages have been displayed

    while True:
        state = graph.get_state(config)

        # Display any new assistant messages that haven't been shown yet
        # (This handles guardrail/off-topic responses)
        if state.values and state.values.get('messages'):
            messages = state.values['messages']
            for idx in range(last_displayed_message_idx + 1, len(messages)):
                msg = messages[idx]
                if msg.get("role") == "assistant":
                    print(f"\n[AI]: {msg['content']}")
            last_displayed_message_idx = len(messages) - 1

        # 2. Check for Interrupts
        if state.tasks and state.tasks[0].interrupts:
            interrupt_info = state.tasks[0].interrupts[0].value

            # --- FIX: Safely handle both String and Dict interrupts ---
            if isinstance(interrupt_info, dict):
                ai_message = interrupt_info.get('content', 'No message content')
                options = interrupt_info.get('available_options', [])
            else:
                ai_message = interrupt_info
                options = []

            print(f"\n[AI]: {ai_message}")
            if options:
                print(f"Options: {', '.join(options)}")
            # -------------------------------------------------------

            user_input = input("\n[YOU]: ")
            print(f"[YOU]: {user_input}")

            # Resume the graph with the user's input
            graph.invoke(Command(resume=user_input), config=config)

        # 3. Check if the graph has finished
        elif not state.next:
            # Before ending, check if there's a final assistant message to print
            if state.values and state.values.get('messages') and state.values['messages'][-1]["role"] == "assistant":
                if last_displayed_message_idx < len(state.values['messages']) - 1:
                    print(f"\n[AI]: {state.values['messages'][-1]['content']}")
            print("\n--- ⚑⚑ Session Ended ---")
            break

        # 4. If nodes are pending but no interrupt, let them run (the gas pedal)
        else:
            graph.invoke(None, config=config)

# IMPORTANT: Set reset=True only when you want to wipe the history.
# Set it to False to actually continue the conversation!
run_booking_session(booking_graph, reset=True)
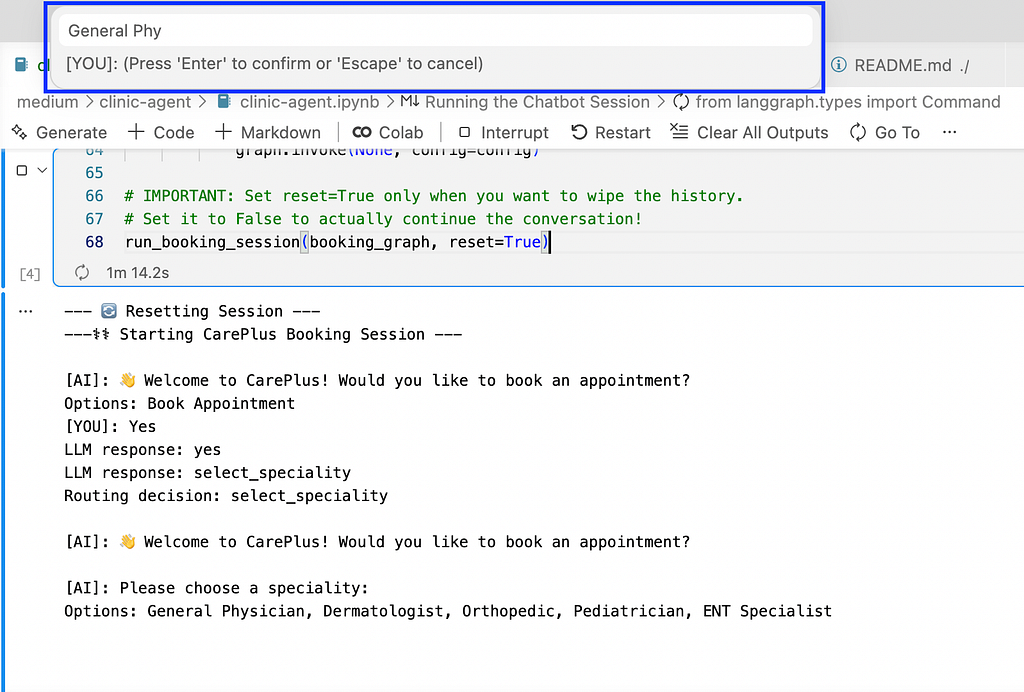
Notice that in the notebook the input box will open at the top of the notebook as shown in the above screenshot.
I have placed the clinic-agent.ipynb notebook in the repo which can be used to run the entire flow.
Conclusion:
In this article, we built an AI-powered clinic booking chatbot using LangGraph, OpenAI GPT, SQLite, and Streamlit. By combining a state-driven agent workflow with a conversational interface, the system can guide users through the entire appointment process — from selecting a medical specialty to confirming a booking. The layered architecture separates the database, services, agent logic, and UI, making the application modular, maintainable, and easy to extend.
This approach demonstrates how conversational AI can simplify real-world workflows such as appointment scheduling while reducing manual administrative work. The system can be further enhanced with features like calendar integration, notifications, multilingual support, or messaging platform integrations. Overall, this project serves as a practical example of how modern AI frameworks and simple web tools can be combined to build intelligent, user-friendly healthcare applications.
References:
- LangGraph Documentation — https://langchain-ai.github.io/langgraph/
Official documentation for LangGraph, explaining how to build state-driven agents and workflows. - Streamlit Documentation — https://docs.streamlit.io/
Guides and tutorials for building interactive Python web applications with Streamlit. - OpenAI API Documentation — https://platform.openai.com/docs
Official documentation for using OpenAI models to build AI-powered applications.
Thank you for reading the article.
The learning curve is steep, but the view is worth it. Follow along if you enjoy the climb.
You can also follow me on Linkedin to get regular updates or further collaboration.
And if your curiosity is still running (like a loop without a break condition), check out my other articles:
- Build Agentic RAG using LangGraph
- Practical Guide to Using ChromaDB for RAG and Semantic Search
- Reading Images with GPT-4o: The Future of Visual Understanding with AI
- Agentic AI Project: Build Mini Perplexity AI Chatbot : Step by Step Guide [Code Included]
- Agentic AI: Build ReAct Agent using LangGraph
- Agentic AI Project: Build a multi-agent system with LangGraph and OpenAI API
- Building an AI Agent with Model Context Protocol (MCP): A Complete Guide
- TOON vs JSON: A Comprehensive Performance Comparison
- Building an Intelligent Resume Transformation Agent Powered by LangGraph and gpt-4o-mini
Agentic AI Project: Build a Customer Service Chatbot for a Clinic was originally published in Towards AI on Medium, where people are continuing the conversation by highlighting and responding to this story.