I Built a Vision-Based Desktop Agent That Navigates by Screenshot. Here’s What Actually Works.
DOM-based automation requires you to reverse-engineer someone else’s frontend and pray they don’t change it. They always change it.

Last month, I spent a couple of weeks attempting to build a testing framework for an app that includes a web app, a Slack app, and connections to multiple external sources, requiring testing of interface elements on external web interfaces. I managed to vibe engineer a Playwright-based test suite that “sort of™” worked.
Until it didn’t.
One of the external sites had updated its dashboard. Not a redesign, just a CSS class rename on a table component. Three automations targeting that table stopped working simultaneously. After spending an afternoon tracking down the issue and rewriting selectors, I thought: There has to be another way of doing this.
So I build something different. A desktop agent that navigates by looking at screenshots, reasoning about what it sees, and clicking with a mouse. No selectors. No DOM. Pixels and a vision-language model running locally on my MacBook Pro.
It works. But getting it to work required patience, perseverance, and solving problems no tutorial mentions.
Why DOM-Based Automation Is Hitting a Wall
The case against using Playwright, Selenium, and Puppeteer to automate services you don’t control comes down to three converging pressures.
Bot detection is winning the arms race. Cloudflare Turnstile, reCAPTCHA v3, and DataDome don’t look for a single “I am a bot” signal. They fingerprint your TLS stack, measure GPU compositing behavior, check WebGL renderer strings, and score sessions based on mouse trajectory patterns [1]. Stealth plugins patch some of these, but the detection surface keeps growing. In February 2026, the maintainer of puppeteer-real-browser stopped updating the project entirely. The evasion treadmill had become unsustainable.
Selector fragility compounds over time. Every UI update from a service you don’t control is a potential break. You’re maintaining a parallel model of someone else’s frontend. Each time something breaks, a resolution could take anywhere from 30 minutes to two hours, or even two days. Multiply that by every service you automate, and the maintenance cost eclipses the time you saved.
The rendering gap gives you away. Headless Chrome doesn’t render identically to real Chrome. Missing GPU compositing, different font rendering, and absent WebGL contexts. These differences are measurable. Detection systems that analyze canvas fingerprints and rendering artifacts can distinguish headless from headed browsers with high accuracy.
Vision-based automation sidesteps all three problems. The agent controls a real browser inside a real macOS VM with full rendering, real cookies, and real GPU compositing. There’s nothing to fingerprint because there’s nothing fake.
The main drawback? The speed tradeoff is real. A Playwright script executes in milliseconds. The vision-based agent takes 3–6 seconds per action. But a Playwright script that breaks every month and gets detected every quarter has an effective uptime that makes the comparison less clear-cut.
The Architecture That Worked
After trying out a couple of VM frameworks and about 20 different models for agent execution, verification, and reasoning. This is the system I landed on:

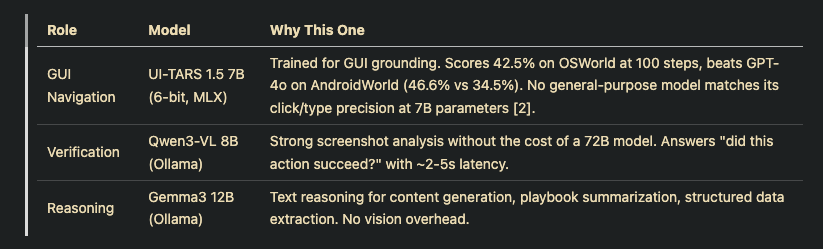
It runs in three layers: VM infrastructure, agent execution, and verification. Each layer uses a different model because no single model does all three jobs well.
The agent execution layer is built on the CUA SDK (Computer-Using Agent), an open-source framework that implements the ComputerAgent loop: capture a screenshot, send it to the VLM, parse the predicted actions, execute them on the VM, and repeat. CUA handles the action loop and VM input interface. The models plug into it; the SDK is the orchestration spine.
The three-model split:
Why not one big multimodal model? I tried.
UI-TARS excels at navigation (clicking the right button, typing in the right field) but fails at judgment. Ask it, “Did the form submit successfully?” and you get unreliable answers.
Qwen3-VL excels at screenshot analysis but can’t drive a GUI.
Using one model for everything means accepting worse performance everywhere. The three-model split lets each model do what it was trained for [2][3].
Memory budget on 32 GB Apple Silicon:
This is where most “run local models” tutorials quietly assume you have 64 GB. If you’re like me and you’re working less memory, here’s how to budget:
- VM (Lume, Apple Virtualization Framework): 8 GB
- UI-TARS 1.5 7B (MLX, always resident): 5.5 GB weights + ~0.4 GB runtime
- One Ollama model at a time: max 8.1 GB (Gemma3 12B, the largest)
- Host macOS: ~5 GB realistic
- Total peak: ~27–28 GB, leaving 4–5 GB headroom
The key constraint: Ollama is configured with OLLAMA_MAX_LOADED_MODELS=1 and every API call includes keep_alive: 0 for immediate model unload after each response. Hot-swapping between Qwen3-VL and Gemma3 12B takes ~5-8 seconds per swap.
Two additional Ollama flags (OLLAMA_FLASH_ATTENTION=1 and OLLAMA_KV_CACHE_TYPE=q8_0) save 1-2 GB of KV cache overhead with negligible quality loss [4].
Another way around this is to spring for a paid Ollama account and use cloud models for Gemma3 and Qwen3-VL.
On 64 GB machines, set OLLAMA_MAX_LOADED_MODELS=2 and skip all of this. Both Ollama models stay resident, and swap latency drops to zero.
Problems I Ran Into
Three engineering problems consumed more debugging time than the entire model integration combined.
Problem 1: The Stale Framebuffer
The CUA SDK captures screenshots via CGDisplayCreateImage, which returns stale framebuffer data inside Apple Virtualization Framework VMs [5]. Your agent sees a screenshot from 10 seconds ago, reasons about outdated UI state, and clicks on elements that no longer exist.
The fix: bypass the CUA SDK’s screenshot method entirely and capture via VNC from the guest OS:
def patch_computer_screenshot(computer, lume_client, vm_name):
    """Replace CUA's screenshot with VNC capture.

    CGDisplayCreateImage returns stale data in Apple
    Virtualization Framework VMs. VNC reads the actual
    framebuffer from the guest OS."""

    async def _vnc_screenshot() -> bytes:
        host, port, password = await _discover_vnc_url(
            lume_client, vm_name
        )
        return await loop.run_in_executor(
            None,
            lambda: _capture_vnc_screenshot(host, port, password),
        )

    computer.interface.screenshot = _vnc_screenshot
This monkey-patches the CUA Computer object so all downstream code (verification, validation, capture) automatically uses VNC without any changes. The patch is applied once during connect_computer() and every screenshot call thereafter reads the live framebuffer via vncdotool [5].
Problem 2: The Enter Key Bug
This one is subtle. UI-TARS is trained to append \n to type(content) when it wants to press Enter. The CUA SDK's convert_to_computer_actions() function passes that \n as literal text to the VM's REST API, which silently drops it. Your agent types text perfectly into a form field and never submits it. No error. No warning. The text sits there.
This fails 30–50% of the time across different services. The CUA SDK team at the time hadn’t addressed it because their reference implementation uses OpenAI’s cloud model, which handles Enter differently than UI-TARS.
The fix: a monkey-patch on convert_to_computer_actions that strips trailing \n from type actions and emits explicit keypresses:
def _post_process_actions(actions, behavior, make_type, make_key):
    """Strip trailing \\n, emit explicit keypress."""
    result = []
    for item in actions:
        action = getattr(item, "action", None)
        if getattr(action, "type", None) != "type":
            result.append(item)
            continue
        text = getattr(action, "text", "")
        if not text.endswith("\n"):
            result.append(item)
            continue
        result.append(make_type(text.rstrip("\n")))
        if behavior == "escape_enter":
            result.append(make_key(["escape"]))  # dismiss autocomplete
        result.append(make_key(["enter"]))
    return result
The escape_enter behavior is configurable per-service. Applications with autocomplete dropdowns (like Slack) need the Escape keypress to dismiss the dropdown before Enter submits. Others only need Enter. The patch checks a configuration value at runtime to select the right behavior.
Problem 3: Verification Is Harder Than Execution
The agent clicking a button is the easy part. Knowing whether the click worked is where I spent significant debugging time.
LLM-based verification introduces non-deterministic flicker. Send the same screenshot to Qwen3-VL twice, asking “Did this action succeed?” and you sometimes get PASS, sometimes FAIL. Across 100+ test iterations, the flicker rate was high enough to make verification unreliable as a sole signal.
The solution: tiered validation.
Tier 1 (~1ms): OpenCV histogram correlation against stored baselines. Deterministic. If the current screenshot matches a known-good baseline above 0.85 similarity, the verification passes without touching an LLM:
def compare_with_baseline(screenshot: bytes, baseline: bytes) -> float:
    """OpenCV histogram correlation. ~1ms for typical images."""
    img = cv2.imdecode(np.frombuffer(screenshot, np.uint8), cv2.IMREAD_COLOR)
    base = cv2.imdecode(np.frombuffer(baseline, np.uint8), cv2.IMREAD_COLOR)

    hist_img = [cv2.calcHist([img], [i], None, [256], [0, 256]) for i in range(3)]
    hist_base = [cv2.calcHist([base], [i], None, [256], [0, 256]) for i in range(3)]

    correlations = [
        cv2.compareHist(h1, h2, cv2.HISTCMP_CORREL)
        for h1, h2 in zip(hist_img, hist_base)
    ]
    return sum((c + 1) / 2 for c in correlations) / 3
Tier 2 (~2–5s): Screenshot sent to Qwen3-VL via Ollama only when Tier 1 can’t match. Either no baseline exists, or the screen has changed enough that histogram correlation falls below the threshold.
Tier 1 eliminated most of the unnecessary LLM calls while maintaining accuracy. New screens go through Tier 2 on their first successful pass, and if they pass, the screenshot is stored as a baseline for future runs. The baseline library grows over time, and Tier 1 handles an increasing share of verifications.
When verification fails entirely, escalation strategies kick in: re-prompt the agent with the failure context, then programmatic keypresses (Escape + Enter), then osascript window activation, then a full shell sequence as a last resort.
Self-Improving Playbooks: The Compounding Advantage
The most counterintuitive result: the agent gets better over time without retraining the models.
Once actions are validated, I built in a write-back step that summarizes the execution’s step log into per-service markdown playbooks. Next time the agent encounters the same service, the playbook is injected into its prompt. The agent follows the playbook’s instructions instead of discovering the workflow from scratch.
Cold-start discovery (no playbook): 50–65% success rate. With playbooks after 10+ successful cycles: 75–90% [6].
This is the compounding advantage vision-based automation has over DOM scripts. A Playwright script doesn’t learn from successful runs. It executes the same selectors forever until they break. A playbook-guided VLM agent adjusts its approach based on accumulated experience.
The playbooks are human-readable YAML with structured flows for login, discovery, and execution. You can inspect, edit, and version-control them. When the agent generates bad instructions, you correct the playbook, and the agent follows the correction next time.
Confidence scores track the reliability of each playbook flow across runs. A flow that succeeds three times in a row gets its confidence boosted (+0.15 per success). A failure resets the counter and decrements confidence (-0.2). The agent can use these scores to decide whether to trust the playbook or fall back to discovery.
What to Do If You’re Considering This
Three practical takeaways from building this system:
Start with the verification problem, not the navigation problem.
Navigation with UI-TARS is surprisingly good out of the box. A 7B model trained for GUI grounding clicks the right elements most of the time. Knowing whether those clicks succeeded is where you’ll spend the bulk of your engineering effort. Build tiered validation first: OpenCV baselines for deterministic cases, VLM verification for novel screens.
Budget for three models, not one.
A single VLM handling navigation, verification, and reasoning sounds simpler but performs worse at all three. On 32 GB Apple Silicon: UI-TARS via MLX (always resident, ~5.9 GB) plus one Ollama model hot-swapped between verification and reasoning works. Expect 5–8 seconds per model swap. On 64 GB, load all three simultaneously and skip the swap overhead.
Use real VMs, not headless browsers.
The entire value proposition is undetectable automation. A real macOS VM running Safari with full rendering, real cookies, and real GPU compositing is invisible to bot detection. Lume gives you Apple Virtualization Framework VMs on macOS with near-native performance and VNC access [5]. The overhead is real (8 GB of memory for the VM), but it’s what makes vision-based automation viable against modern detection.
The Tradeoff Is Speed for Resilience
The Playwright scripts that broke haven’t been rewritten. The vision-based agent now handles those same services. Not faster. The VLM takes 3–6 seconds per action, whereas Playwright took milliseconds. But it hasn’t broken once through multiple UI updates that would have required selector rewrites.
Speed isn’t the value proposition. Resilience and intelligence is. An agent that’s slower but never breaks beats one that’s fast until it isn’t. And an agent that can take intelligent actions like filing bug reports when something breaks is pretty useful.
DOM-based automation will continue to work in controlled environments: your own apps, stable internal tools, and CI testing. For anything where the UI isn’t yours and might change, vision-based is where this is going. The models are good enough. UI-TARS 1.5 7B runs on a laptop and outperforms GPT-4o on mobile GUI tasks [2].
The engineering is the hard part, but solvable.
References
[1] ScrapingBee, “How to Bypass Cloudflare Antibot Protection at Scale in 2026,” ScrapingBee Blog, 2026. Available: https://www.scrapingbee.com/blog/how-to-bypass-cloudflare-antibot-protection-at-scale/
[2] ByteDance, “UI-TARS-1.5–7B,” Hugging Face Model Card, Apr. 2025. Available: https://huggingface.co/ByteDance-Seed/UI-TARS-1.5-7B
[3] OpenAI, “Computer-Using Agent,” OpenAI Blog, 2025. Available: https://openai.com/index/computer-using-agent/
[4] Ollama, “FAQ: GPU and Memory Management,” Ollama Documentation, 2025. Available: https://docs.ollama.com/faq
[5] Cua, “What is Lume? Getting Started,” Cua Documentation, 2025. Available: https://cua.ai/docs/lume/guide/getting-started/introduction
[6] X. Liu et al., “OSWorld: Benchmarking Multimodal Agents for Open-Ended Tasks in Real Computer Environments,” Proc. NeurIPS, 2024. Available: https://os-world.github.io/
I Built a Vision-Based Desktop Agent That Navigates by Screenshot. Here's What Actually Works. was originally published in Towards AI on Medium, where people are continuing the conversation by highlighting and responding to this story.